
Star Butterfly

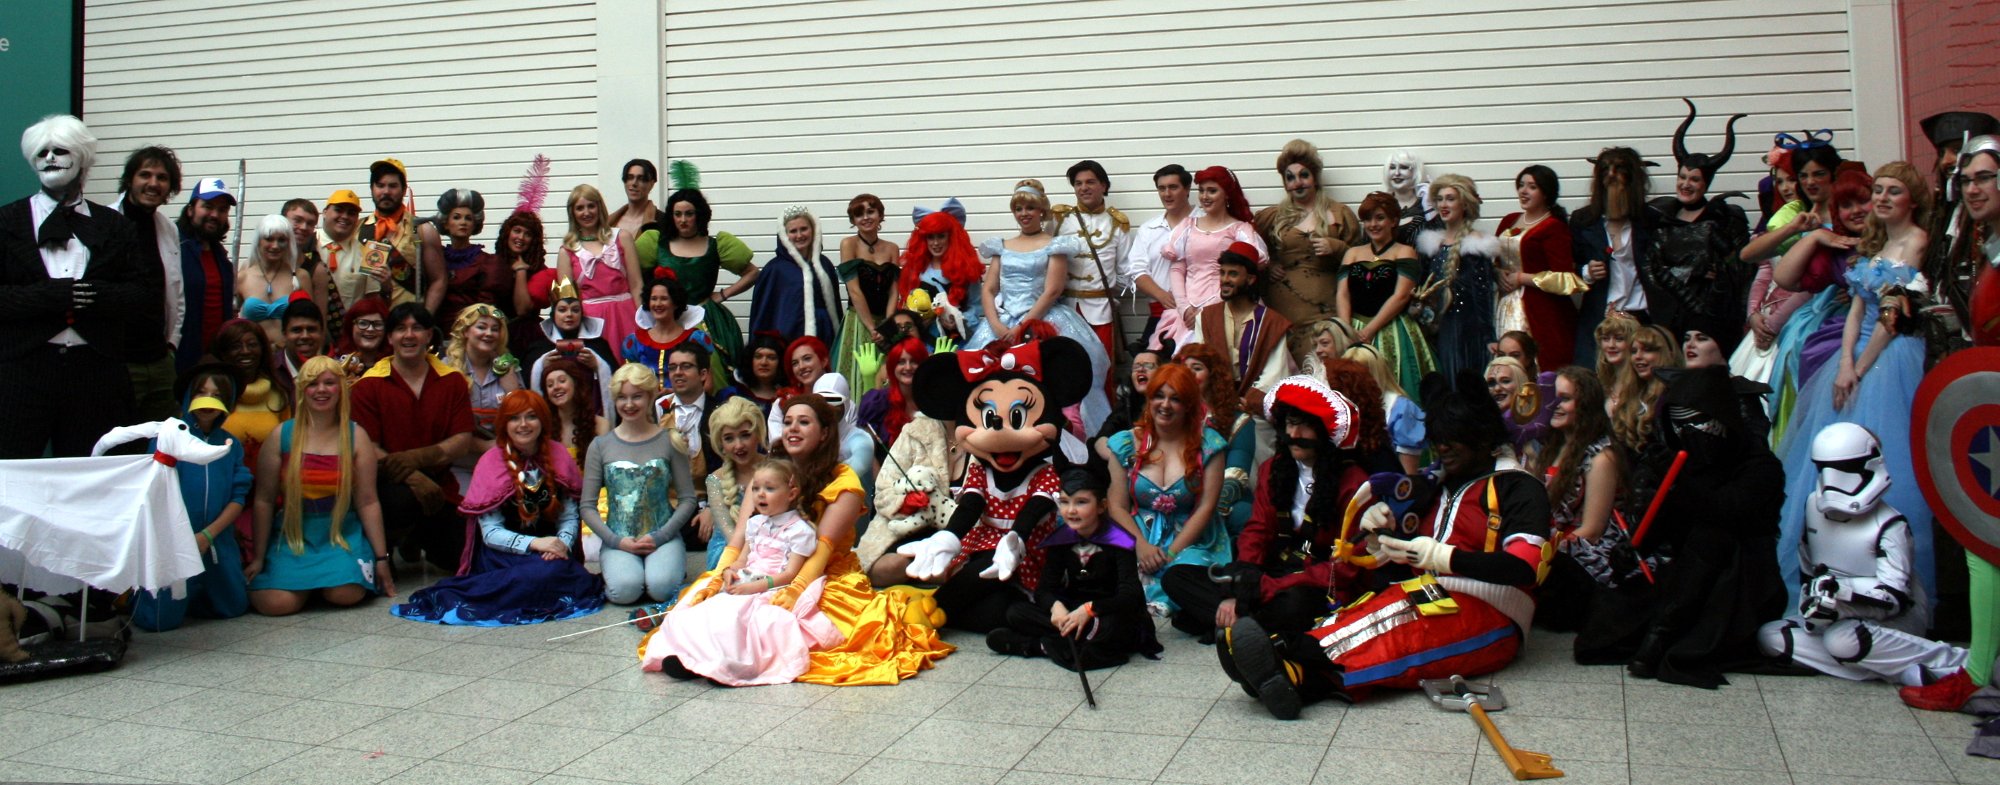 There was a huge Disney meet on the third day of London MCM, which I went to dressed as Star Butterfly. Star Butterfly is a character from the Disney show Star vs the Forces of Evil.
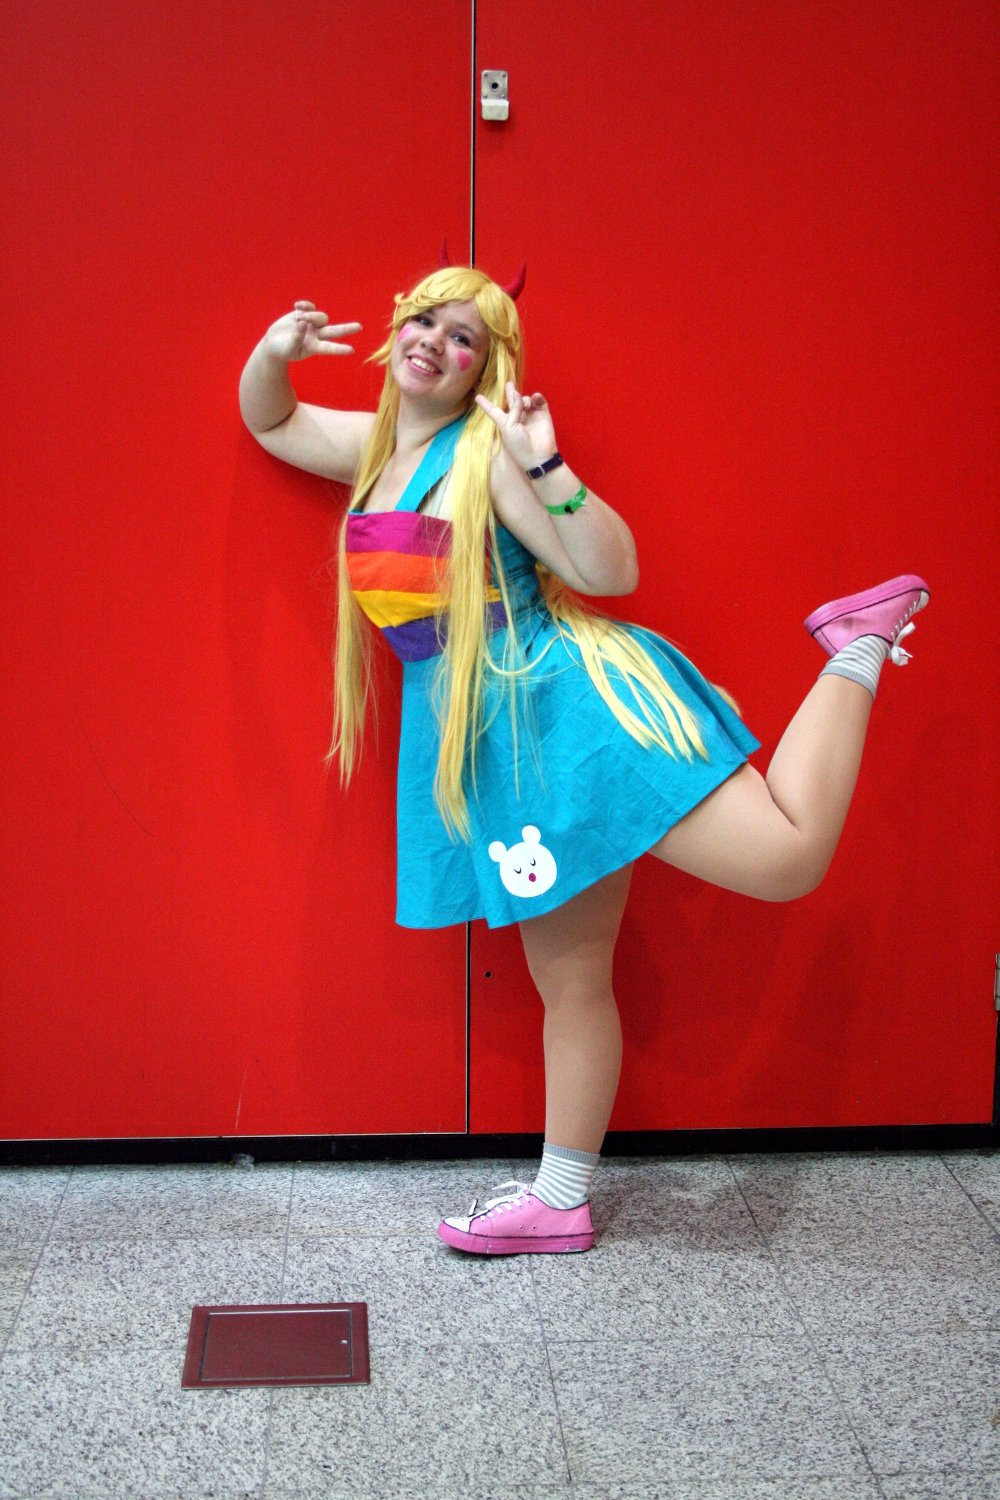 For this cosplay, I made the dress and the headband, painted the shoes, and styled the wig. Making the dress was much more of a pain than I originally thought it would be. I had to shape the front of the dress by curving each of the front stripe pieces just right, but I had a lot of trouble doing this. I finally got the shape of the front right and attached to the back, when I discovered I'd somehow made the front piece much wider than the back piece. The bodice somehow still fit, but the front panel wrapped around further than I wanted it to. The skirt went on with little fuss, although I did somehow catch extra fabric in the hem a few times. I lined the bodice of the dress with darted teal fabric - I wasn't about to try and stripe the inside too!
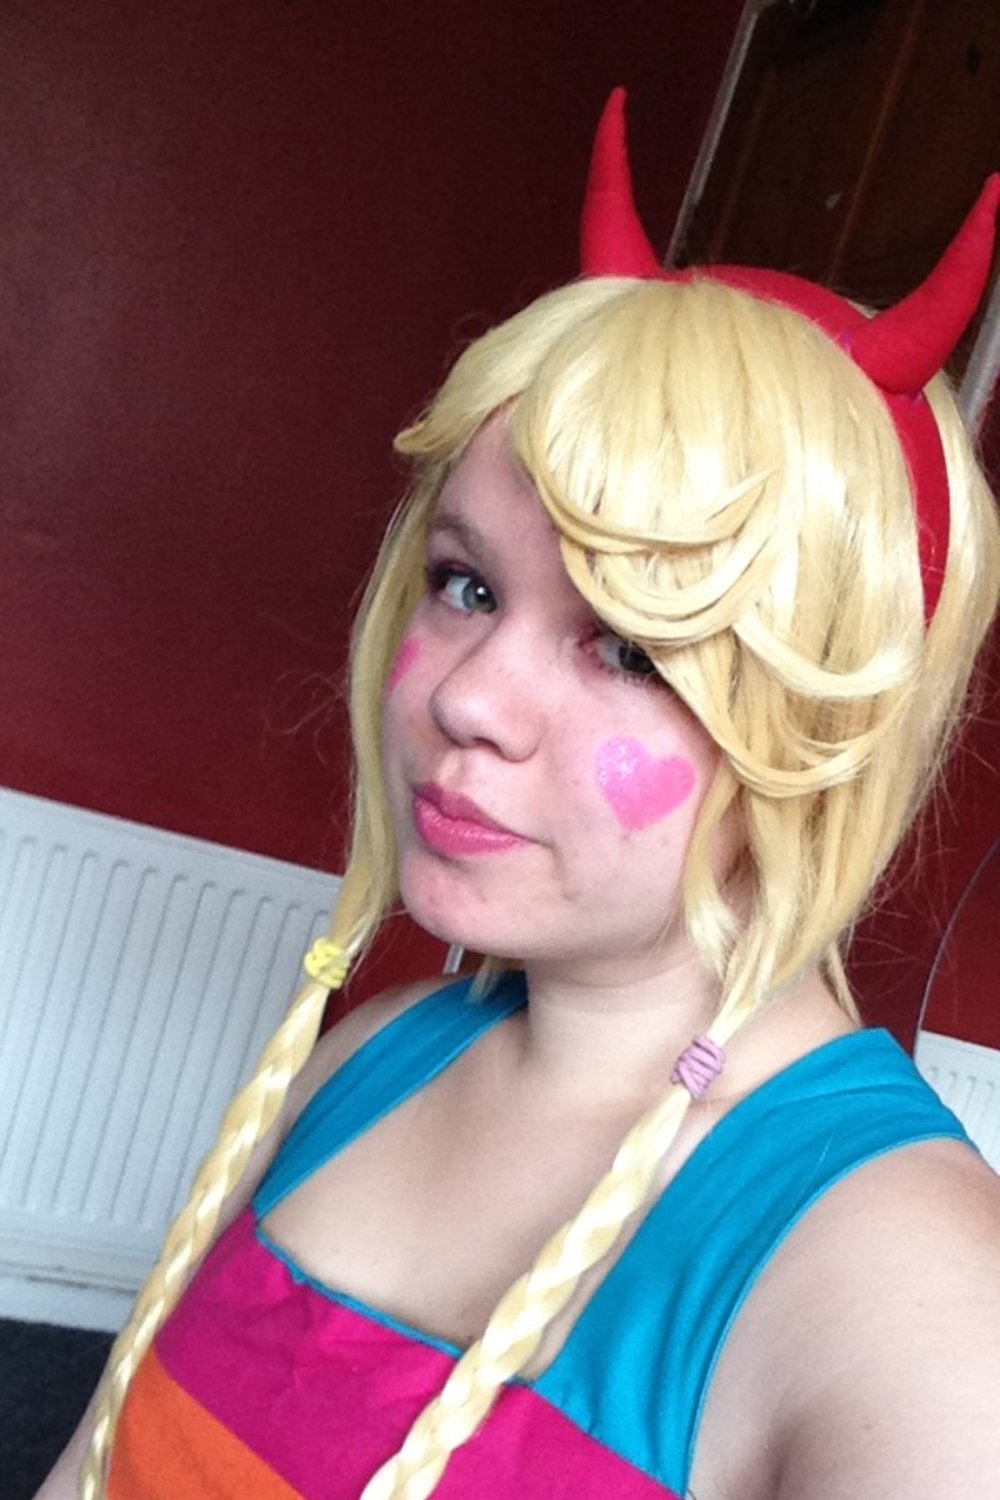 This is the first time I've properly styled a wig for a cosplay. I styled it using craft glue, which meant the front of the wig didn't move at all during the day. The headband was made by hot gluing fabric over an alice band, then hot gluing stuffing filled fabric horns onto that.The shoes I painted with multiple layers of acrylic paint to match Star's shoes in the show. In the show she wears rabbit faced boots instead, but I had to work with what I had. I also sewed, painted, and glued on little rabbit ears to the shoes, but those fell off very quickly. The paint on the rubber soles of the shoes scraped off pretty quickly. I unfortunately didn't think to take pictures of the shoes before the convention.
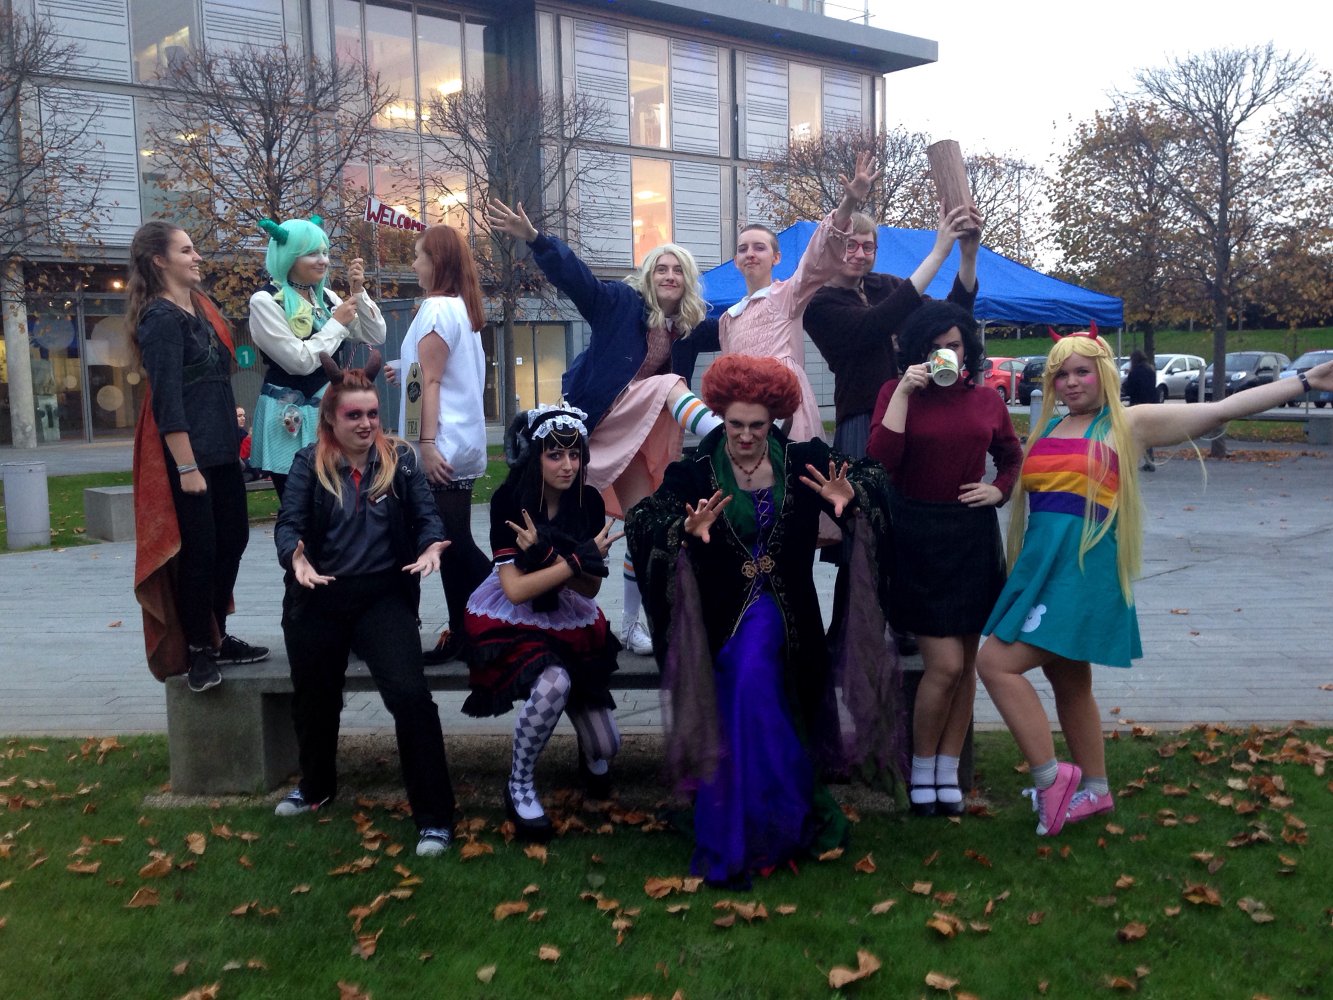 This cosplay was so cute I ended up wearing it for Halloween! Since I'm on a costume course, many people wore really, really good costumes. This costume was lots of fun, and I plan on wearing the dress again as normal clothing.
Nardole from Doctor Who

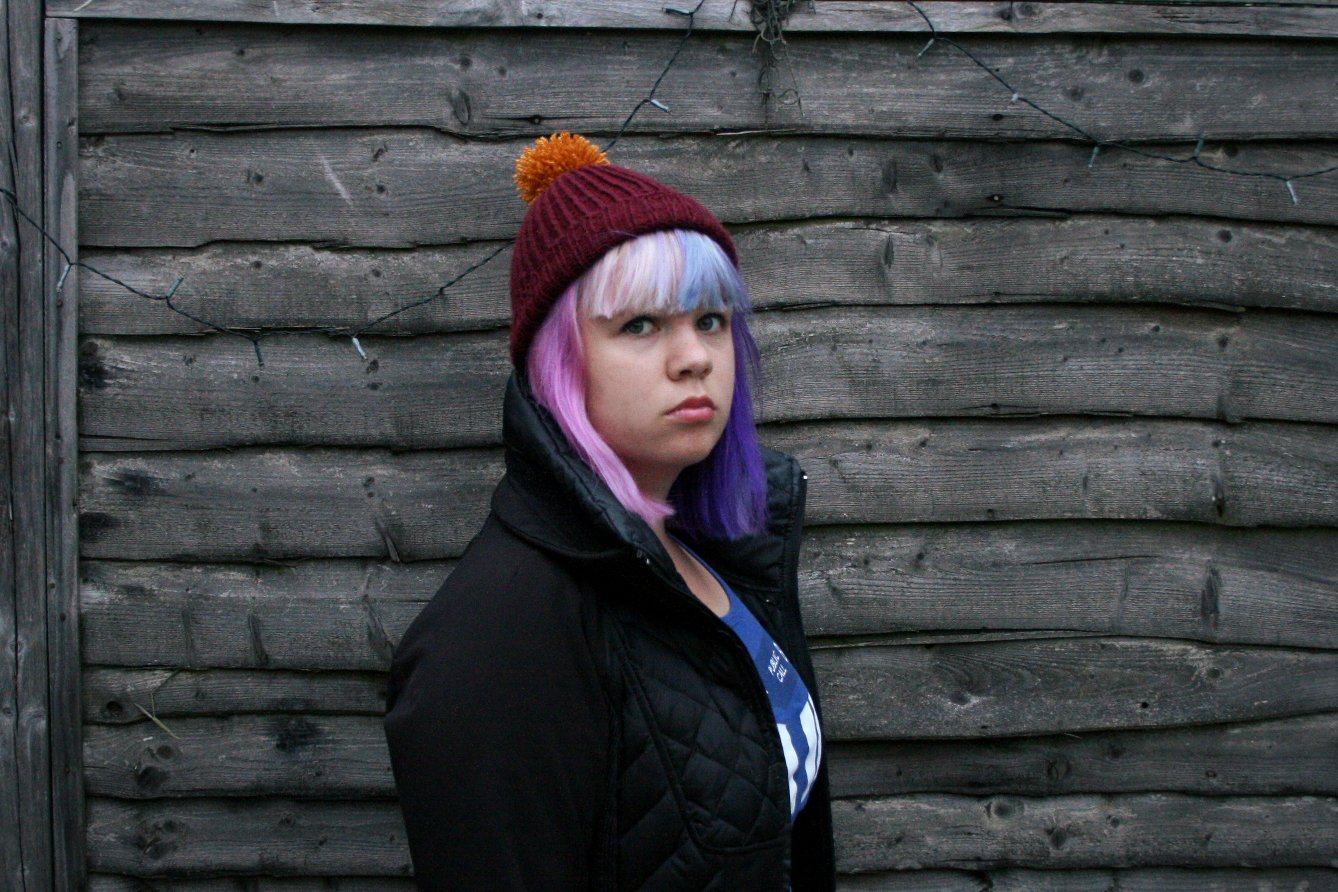
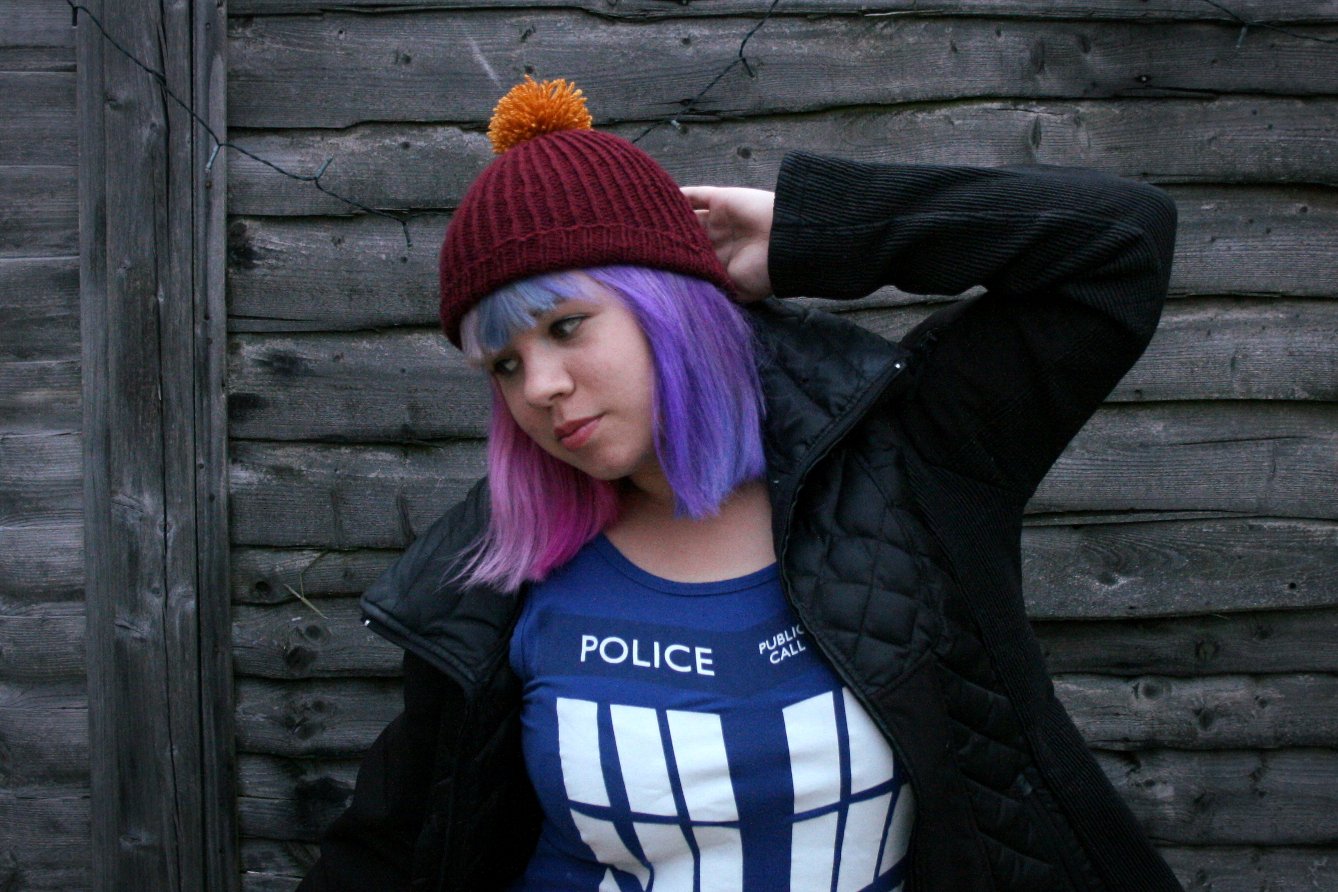
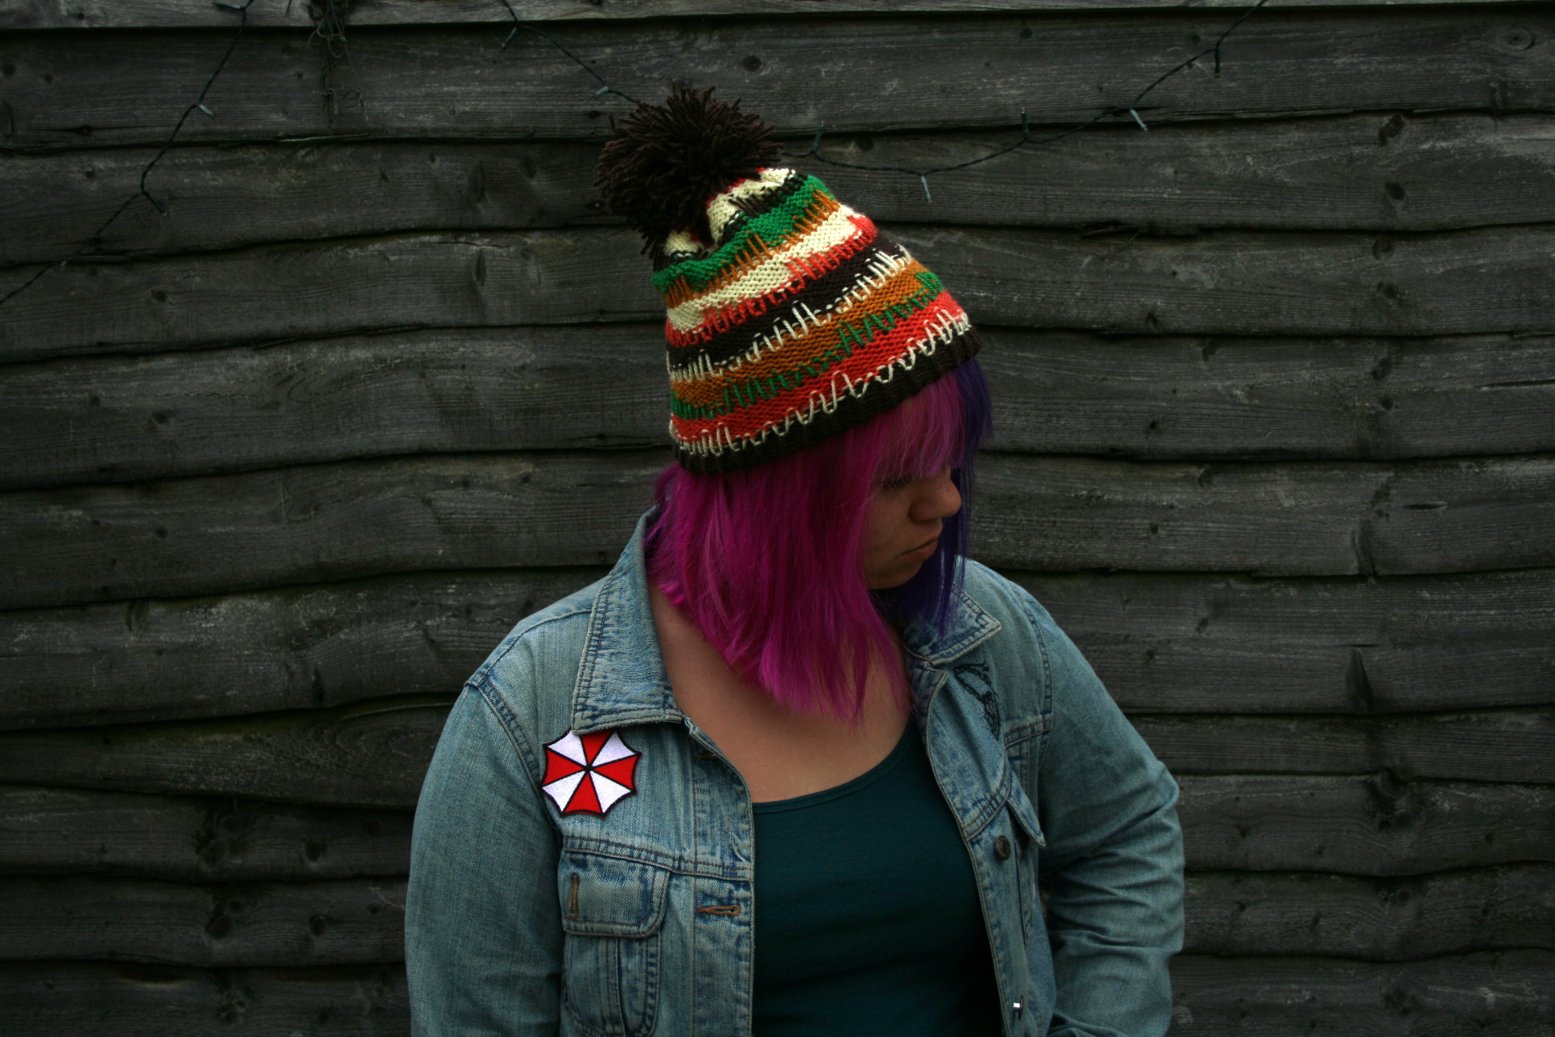
On the second day of London MCM, I wore a cosplay of Nardole from the Doctor Who episode Eaters of Light. I'm starting with the second day because I neglected to get pictures of the costume I wore the first day, but hopefully I'll get some soon.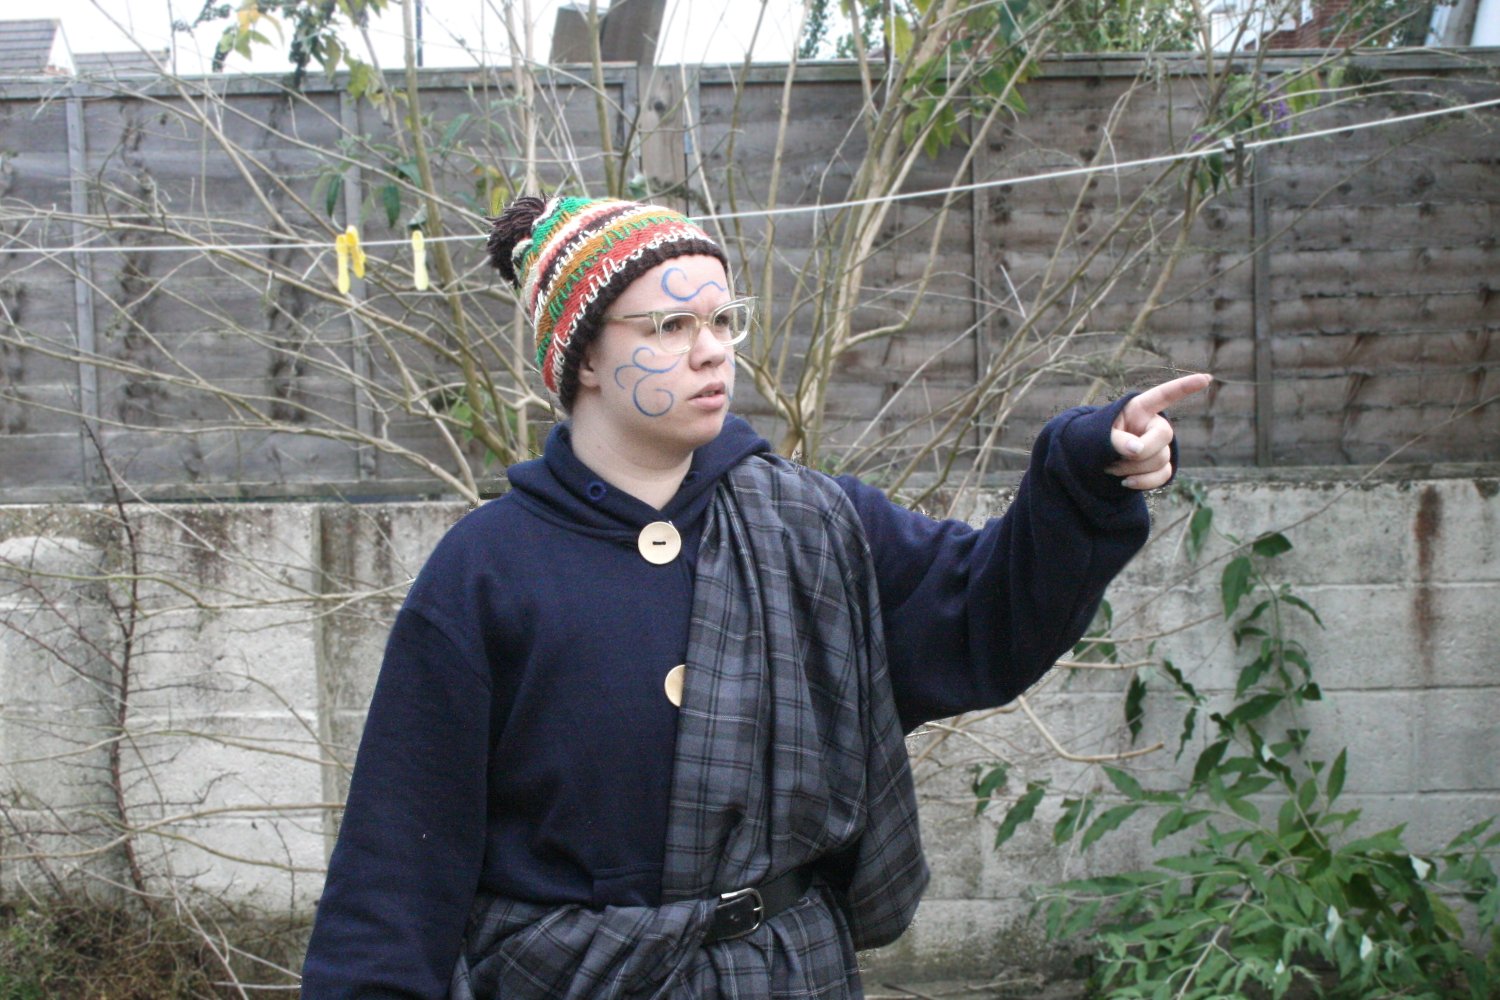 The Nardole costume consisted of a hand knit hat, a sweatshirt, pajama pants, and a kilt. The kilt was simply a huge piece of fabric with serged edges. Unlike how the kilt is worn in the show, I wore mine the same way that one would wear a great kilt.
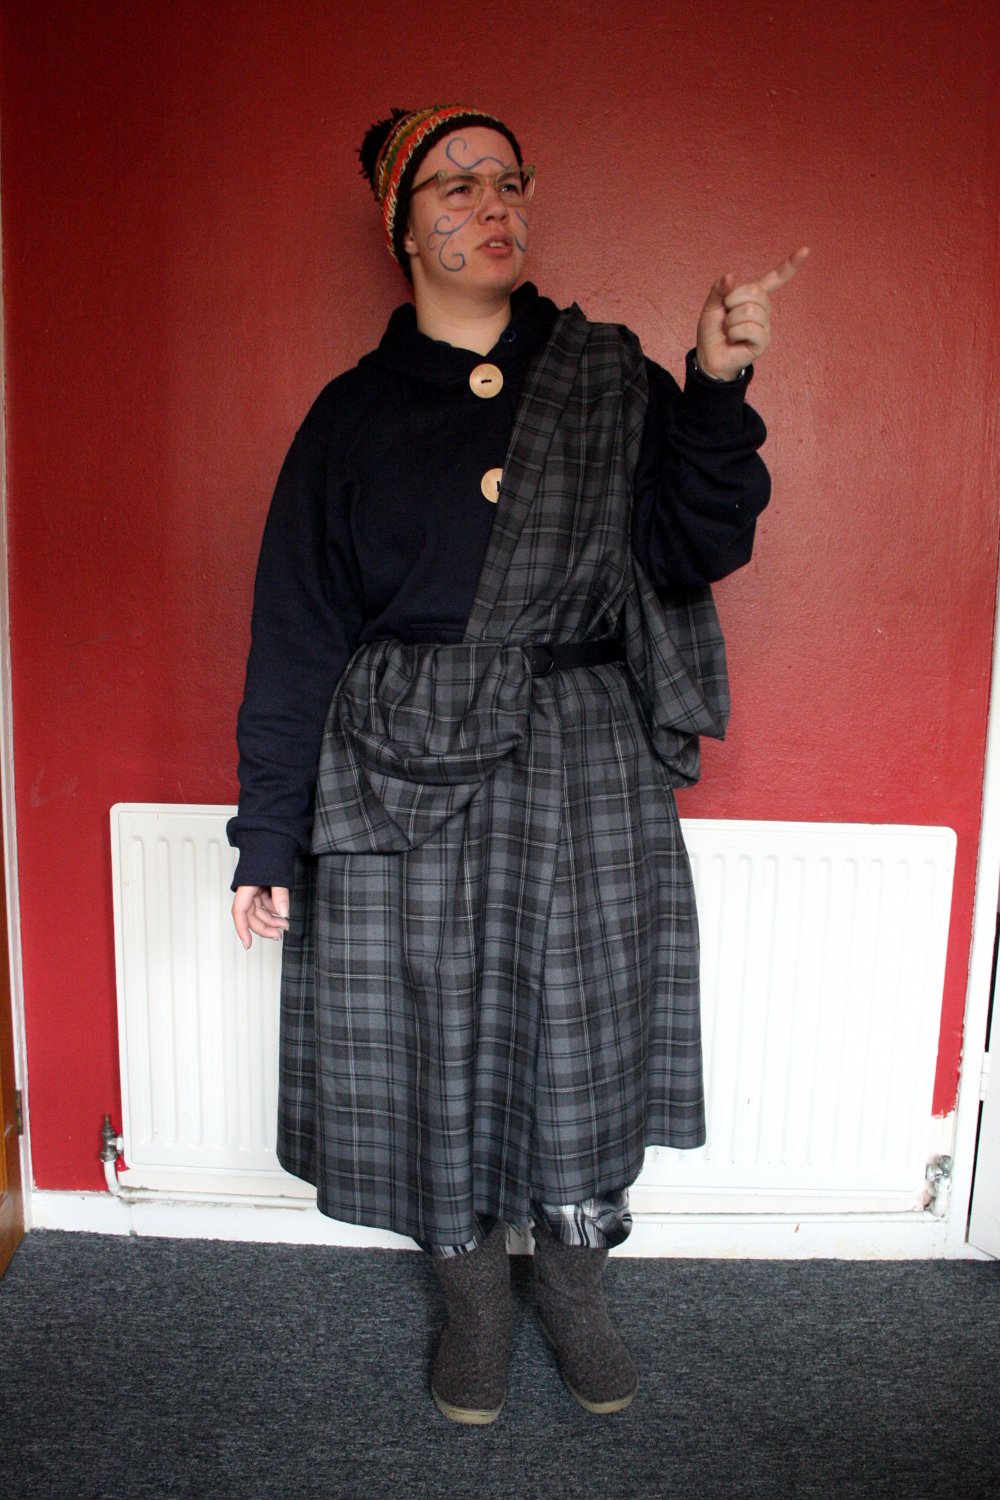 Since the sweatshirt was fairly simple in design, I opted to modify a blue zip up sweatshirt I already had instead of making one from scratch. I started by taking out the zipper and the hoodie cord. Then, I added buttonholes and large wooden buttons down the front of the hoodie. Even though I'd taken out the bright white hoodie cord, the eyelets in the hood were still visible in bright silver, so I buttonhole stitched all the way around them.
 The hat I wore is one I've already posted about, and have actually written up a pattern for, so be sure to check that out!This is, by far, one of the most comfortable cosplays I have ever worn. I basically got to walk around in pajamas all day, it was great!
Floral Skirt, Bandana, and Pencil Case

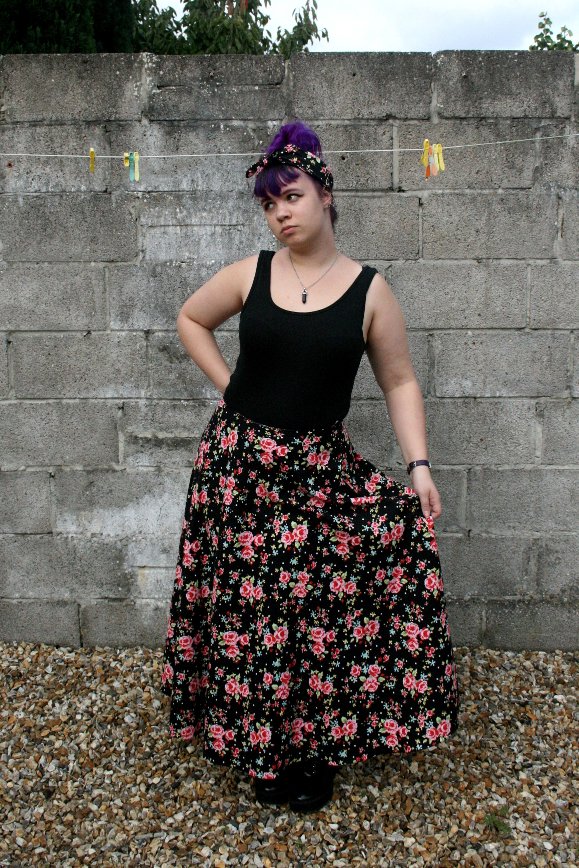 On Tuesday afternoon I headed out to Fabricland to purchase a zipper I needed for an upcoming project. While there, I spotted this floral fabric for £4.59 a meter and immediately knew I wanted to make myself a full length skirt.
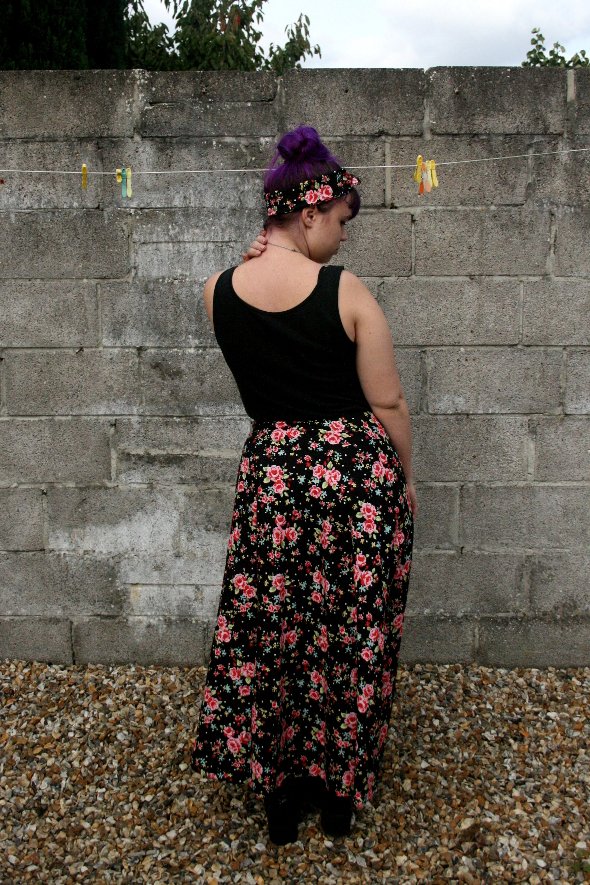 The skirt is made from two quarter circle panels with an invisible zip on the side. I think this is the first time I've thought ahead when making a skirt and added two inches in length to the back before sewing the panels together. Usually when evening out the hem of a skirt I'll have to trim down the sides and front, but not this time!
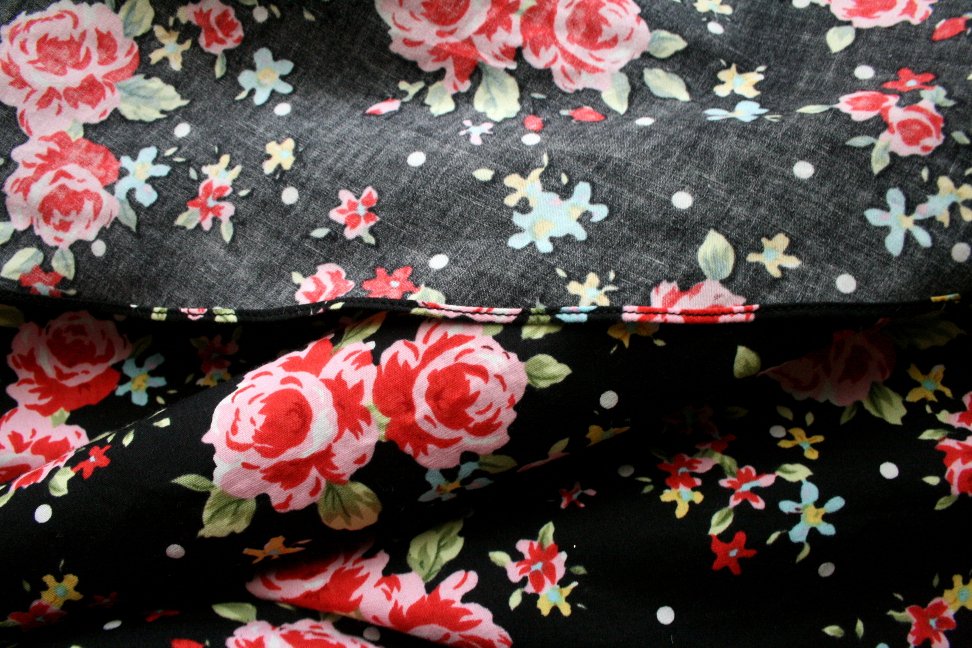 This skirt was the first time I've ever used a rolled hem sewing machine foot. It was so much easier to use than I thought it would be, and created such a neat hem! I want to use this foot for every single project I make from now on!
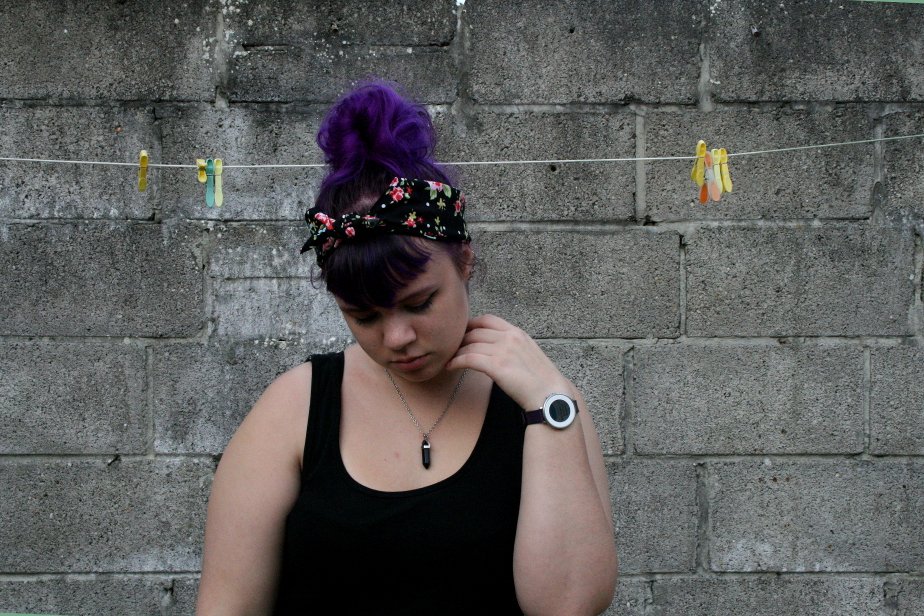 I thought the skirt would use up almost all of the 3 meters of fabric I bought, but I was wrong. With about 70 centimeters of fabric remaining, I was able to make both a bandana and a pencil case. The bandana was pretty much just an excuse to use my rolled hem foot, as I hardly ever wear bandanas.
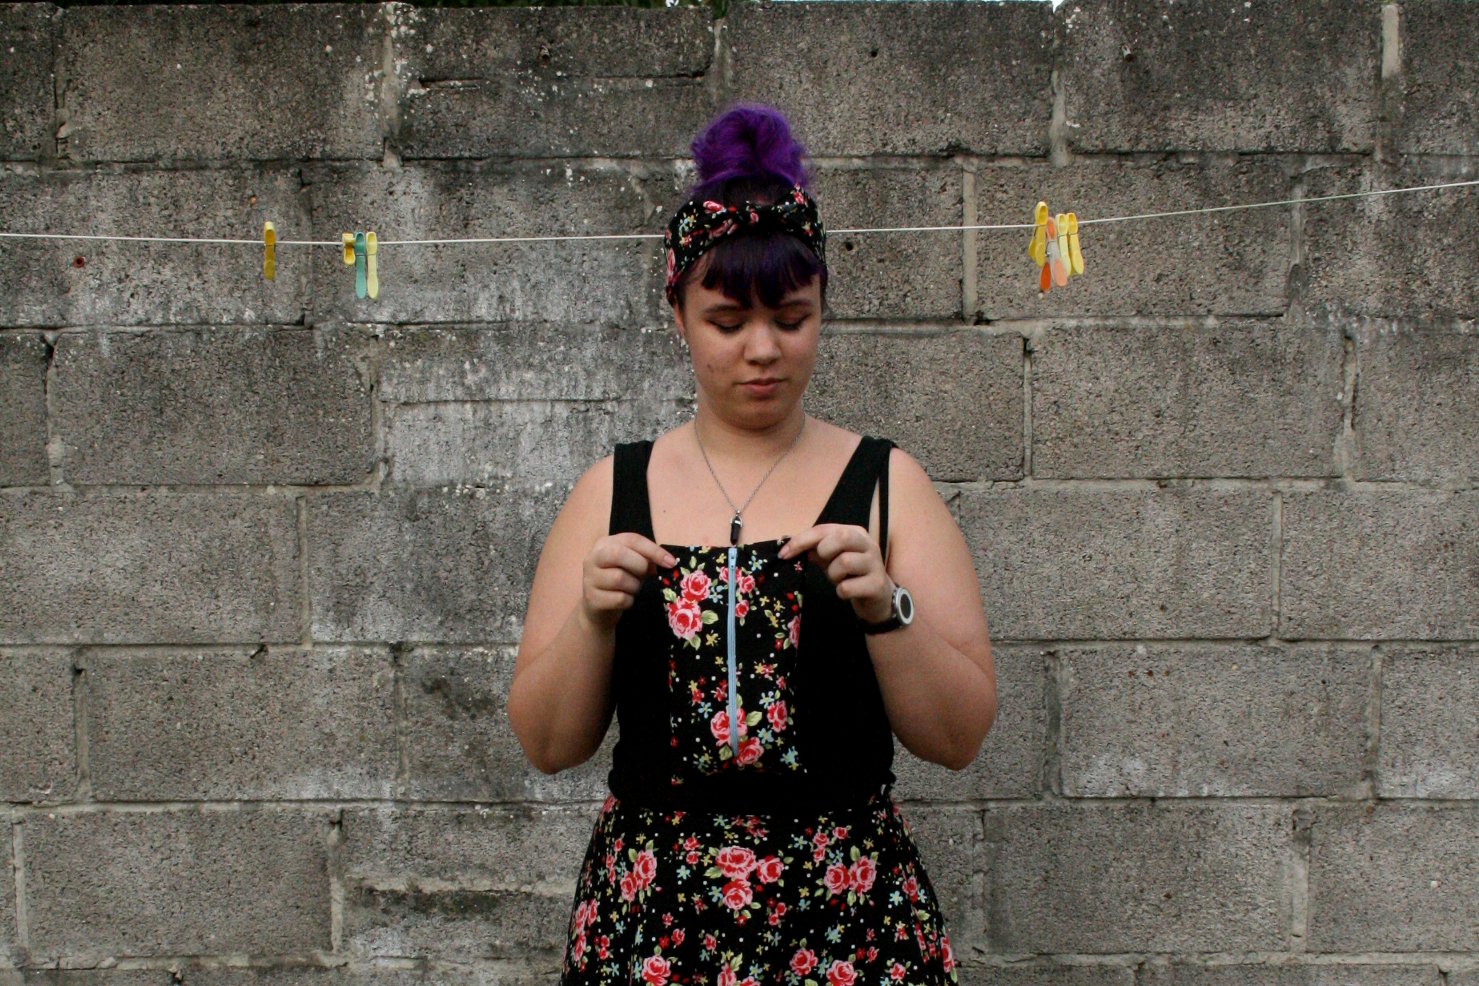 The pencil case was a bit fiddly to make. I needed one that would fit all my uni supplies in it, and I wanted it to be fully lined. I didn't take any pictures of the making process, and it's difficult to describe how I made it. However, if anyone is interested, I would be happy to make a tutorial on how to make your own.
 I am extremely happy with everything I made, although I doubt I'll wear the bandana with any other outfit. The pencil case has already proved very useful and hasn't fallen apart yet. I want to make about a hundred more half circle skirts with rolled hems, they're so simple and so comfy!
Wilf's Hat from The End of Time

After knitting two of Nardole's hats, I felt as though I needed more hats. Why? I don't know, I can't possibly find the time to wear them all if I keep making them at this speed! This hat is Wilf's hat from the Doctor Who episode The End of Time. I remember when I first watched the episode I noticed the hat, but I didn't think I'd end up making it because it looked so complex. Fast forward to a few months later, and I've knitted up the hat! I found a this lovely pattern by Patricia Schönhold on Ravelry. It was my first time knitting from a chart, as well as my first time knitting bobbles. The pattern was easy to understand, and I had no problems with any of it.
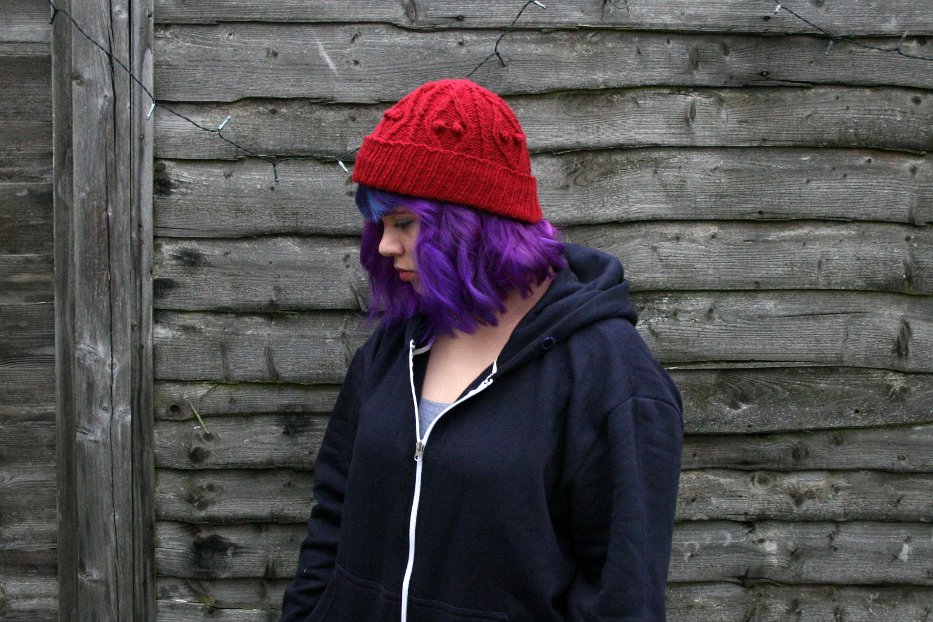 I knitted this hat up with Stylecraft Special DK in Lipstick (this might be wrong, I've lost the label) with size 8 (5.0 mm) knitting needles. I realize I've used Stylecraft in most of my recent projects. That's because Stylecraft is really easy for me to get and it comes in a huge number of colors.
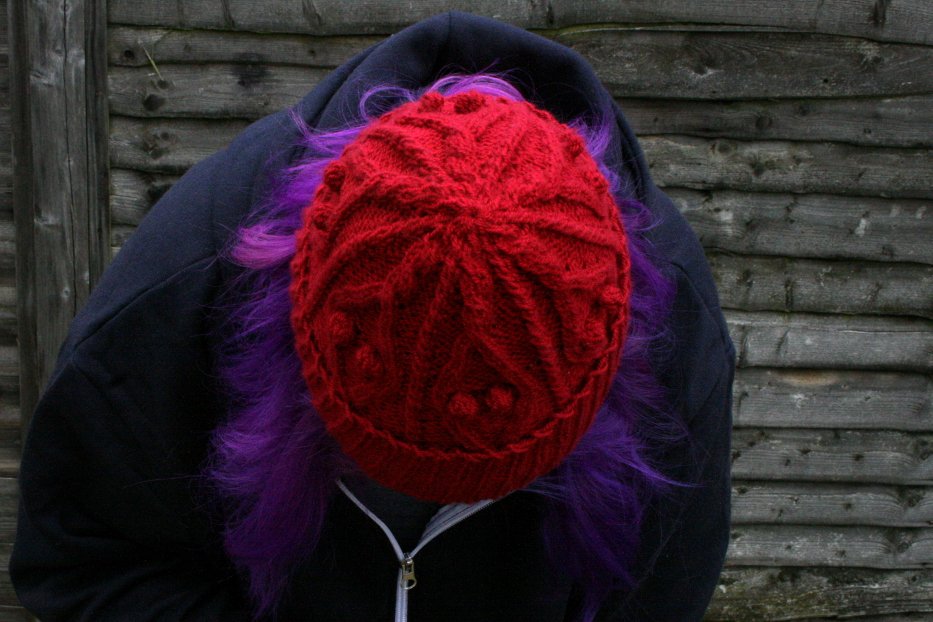 I did end up changing the pattern just a bit. Near the crown of the head, I added two extra twists in the large cables. Because of this, the number of stitches I had on my needles did not match up with the pattern and I ended up decreasing differently. I don't remember exactly what I did, but the difference is visible.
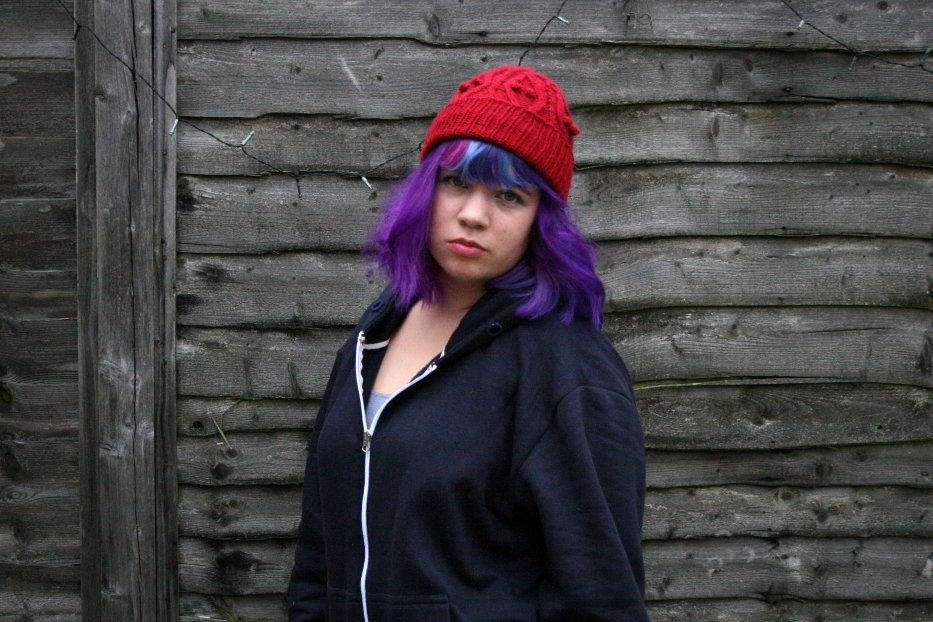 I'm very happy with Wilf's hat, and I definitely wouldn't have been able to make it without the pattern I found. I am glad that Patricia Schönhold put this pattern up, and I would recommend it to anyone else looking to make Wilf's hat.
Phases of the Moon Skirt

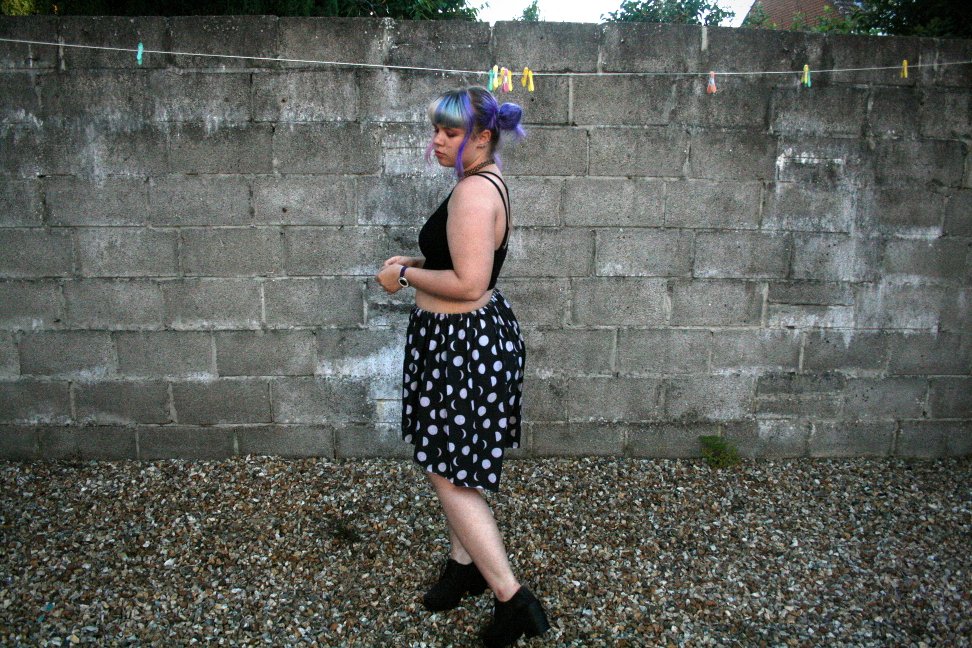 I designed this fabric, Phases of the Moon, a couple years ago, with no real plan besides releasing it on Spoonflower.
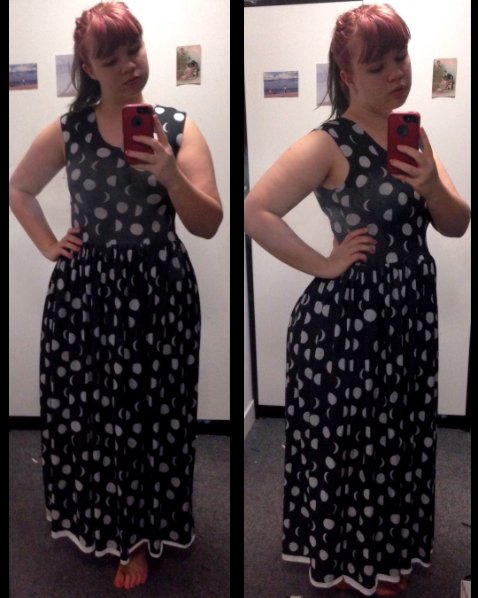 I bought myself two yards last year with the intent of making a dress. It didn't work out and I can't remember exactly what happened, but pieces of the fabric remained in my fabric box up until this Thursday.
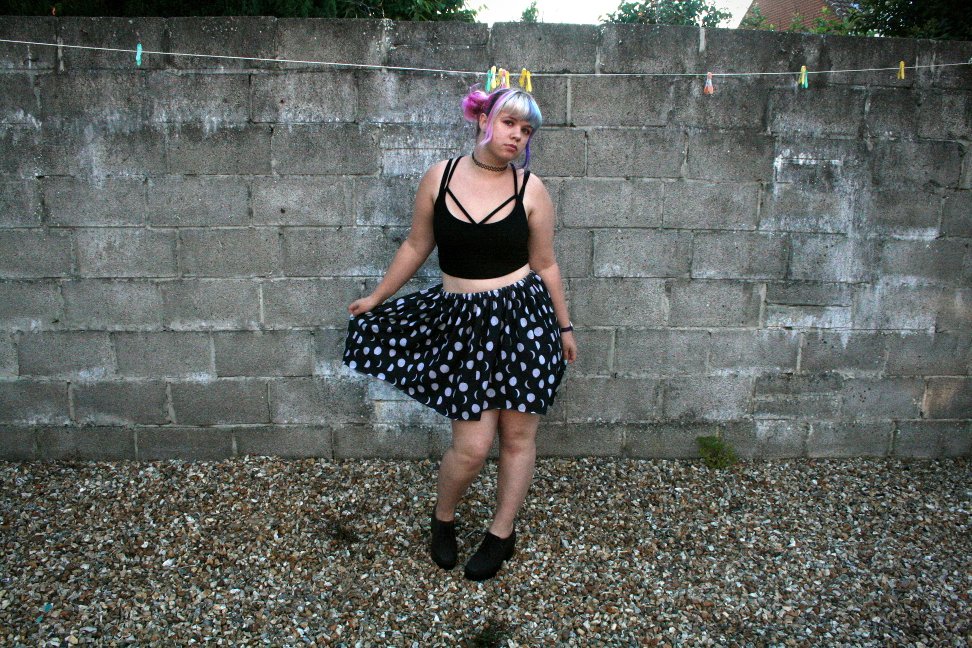 When I pulled the fabric out, I found I'd already cut out the perfect base for a high/low hem skirt. I couldn't find the top half of the dress anywhere. All that I did was sew a narrow casing and put a bit of elastic through it. Since it was a knit fabric, I didn't even hem it. Ridiculously simple!
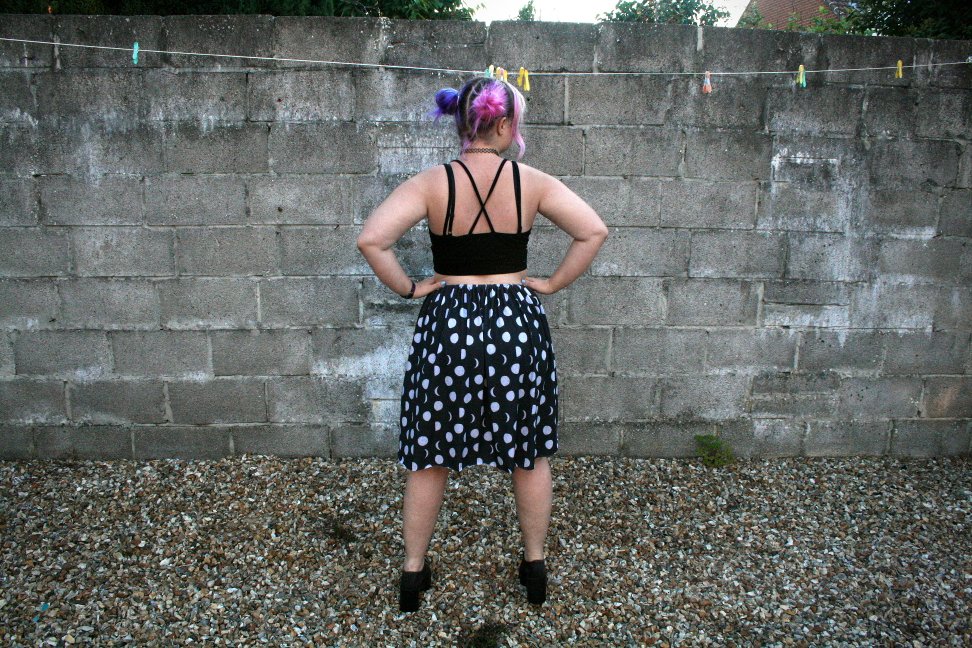 The fabric is amazing! My design looks great, and the fabric I chose was Modern Jersey. There are some small design details that do not show up on the fabric, but that's my own fault. I had written the names of each moon phase under the corresponding moon in a light grey. The words were too tiny to show up against such a dark background.
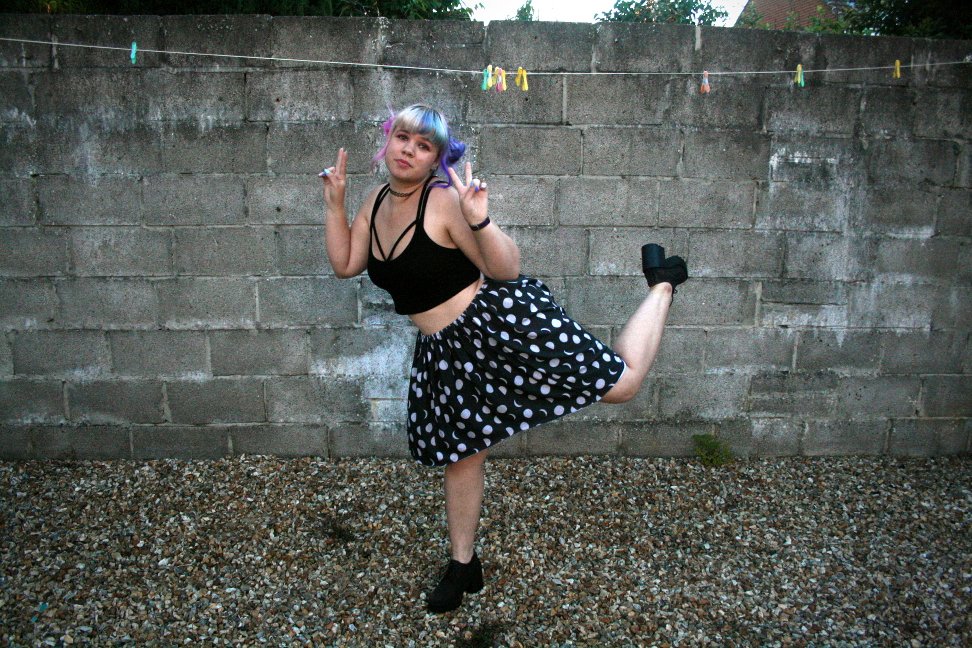 I I'm kind of disappointed I wasn't able to make the dress I wanted, but I'm happy with what I made. If I do ever find the rest of the moon fabric, I'll probably make a matching crop top.
Nardole's Hat from The Doctor Falls
nardole hat side 2

front nardole hat
That's right! I made another one of Nardole's hats! This one is from last week's Doctor Who episode, The Doctor Falls. It was super simple to make compared to the last one!Even though I'm very happy with how my hat turned out, the pattern I've put at the bottom of the post is slightly different from the hat pictured here. This is because the one I made is small (it fits my head, but it might not fit yours), and I mistakenly made my hat a bit too short.What you'll need:
US size 8 needles (5mm)
Double knit or worsted weight yarn
side of nardole hat
I used Stylecraft Special DK in 1035 Burgundy and 1709 Gold.
Cast on 96 st, k1, p1, all the way around for 9 inches, then work the following rows:
It may help to divide your stitches into 6 equal sections of 16 stitches
Row 1: *p2tog, k1, p1, k1, p1, k1, p1, k1, p1, k1, p1, k1, p1, k2tog tbl, repeat from * (total of 84 stitches)
Row 2: p1, k1, all the way around
Row 3: *k2tog, p1, k1, p1, k1, p1, k1, p1, k1, p1, k1, p2tog tbl, repeat from * (total of 72 stitches)
Row 4: k1, p1, all the way around
Row 5: *p2tog, k1, p1, k1, p1, k1, p1, k1, p1, k2tog tbl, repeat from * (total of 60 stitches)
Row 6: p1, k1, all the way aroundRow 7: *k2tog, p1, k1, p1, k1, p1, k1, p2tog tbl, repeat from * (total of 48 stitches)
Row 8: k1, p1, all the way around
Row 9: *p2tog, k1, p1, k1, p1, k2tog tbl, repeat from * (total of 36 stitches)
Row 10: p1, k1, all the way around
Row 11: *k2tog, p1, k1, p2tog tbl, repeat from * (total of 24 stitches)
Row 12: k1, p1, all the way around
Pull the yarn tail through remaining stitches, pull tight, and secure ends.
All that's left is to add your pom pom on top and you're done!
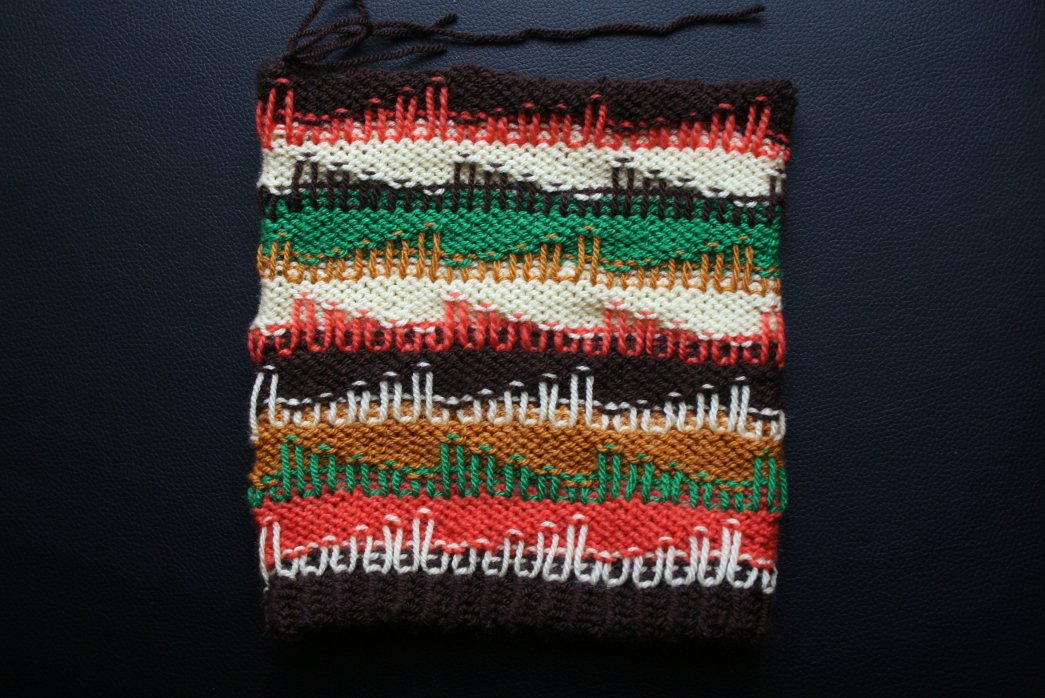
Nardole's Hat from The Eaters of Light
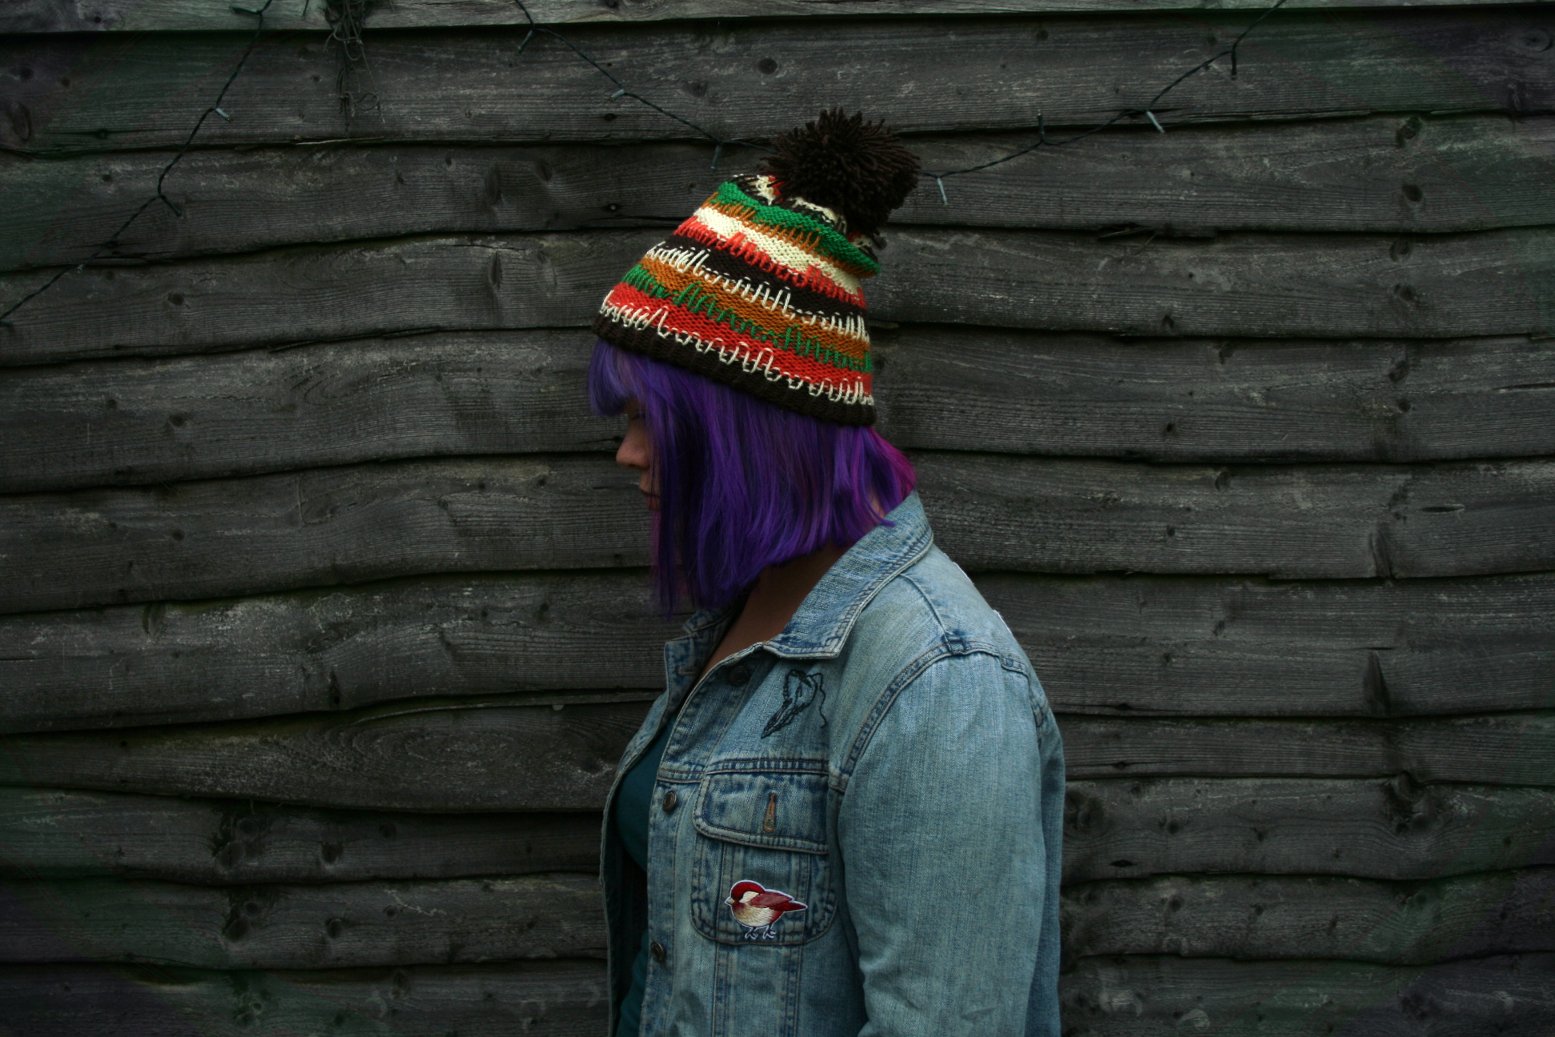
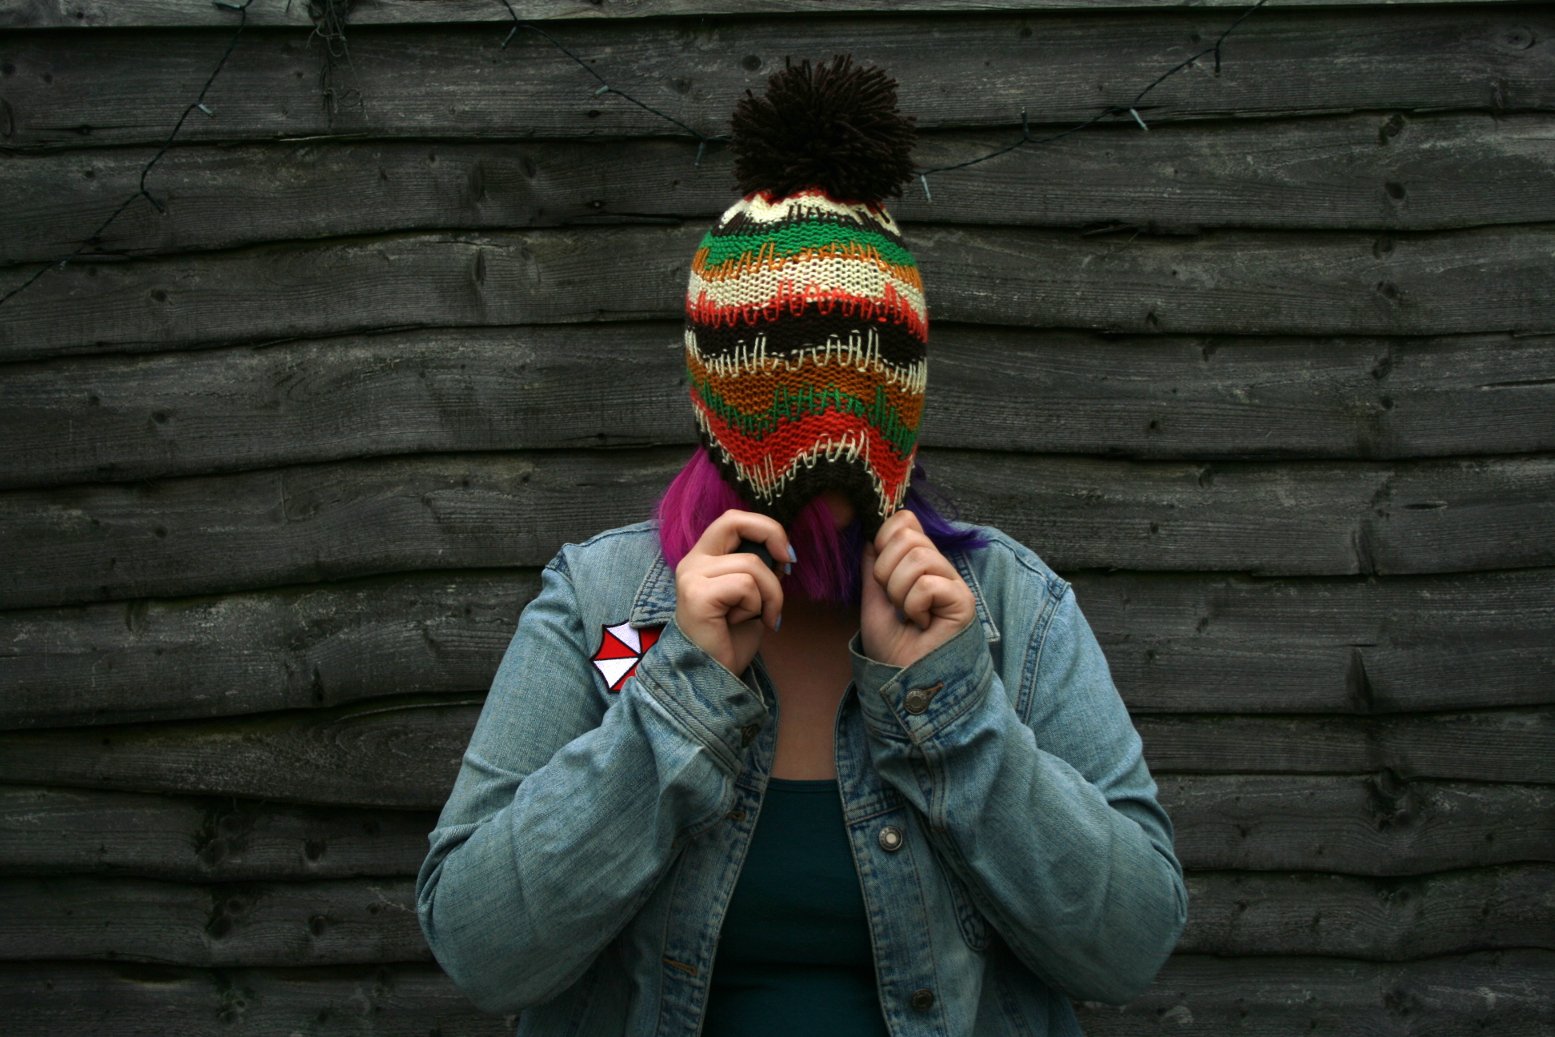
This is my version of the hat that Nardole wears in the Doctor Who episode The Eaters of Light. When this episode aired last week, I immediately knew that I needed to make his hat. It was fairly simple to make, and I'll share my process so that anyone who wants one can make one too.What you'll need:
US size 8 needles (5mm)
Double knit or worsted weight yarn
Special Stylecraft DK in Lemon Shade 1020
Special Stylecraft DK in Dark Brown Shade 1004
Special Stylecraft DK in Green 1116
Special Stylecraft DK in Camel 1420
Special Stylecraft DK in Spice 1711
Cast on 70 stitches in the round in dark brown (must be a multiple of 10)
Rows 1-13: k1, p1 all the way around
Row 14: fold the brim to the inside of the hat attach to previous row with k1, p1
From here on, the every row is purled. (The design is worked on top after completion)
1 row in lemon, 7 rows in spice,
1 row in green, 7 rows in camel,
1 row in lemon, 7 rows in dark brown,
1 row in spice, 7 rows in lemon,
1 row in camel, 7 rows in green,
1 row in dark brown, 7 rows in lemon,
1 row in spice, 7 rows in dark brown.
On the last row, pull a piece of yarn through all of the stitches. Do not gather it yet, it is easier to work in the design beforehand.
outside of nardole’s hat
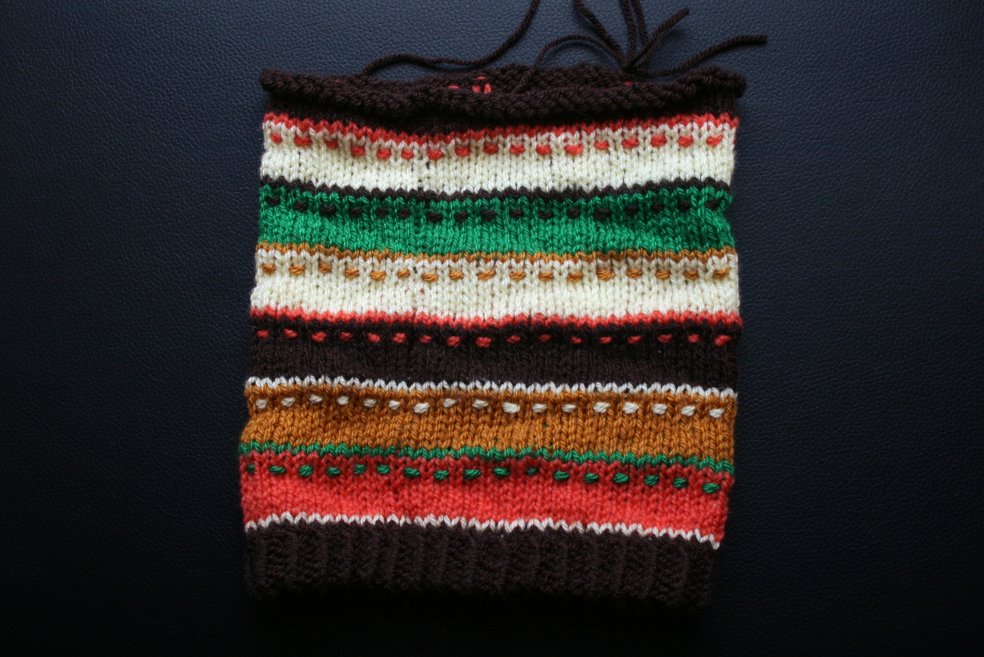
inside of nardole's hat
The design on top is made by weaving pieces of yarn that are the same color as the single rows. They are woven around the knit stitch below this row and brought up to the stripe above at varying heights. This is difficult for me to explain, but I hope the pictures are good enough to understand what I mean. After making the design, tighten the yarn you previously pulled through the top row of stitches and secure. Make a large pom pom out of the dark brown yarn and attach it to the top.
If anyone does make this hat, be sure to let me know!
Since it's summer, I doubt I'll be wearing the hat any time soon. As soon as cold weather hits, though, I'll be wearing it all the time!
Icecream Crop Top

 I've had this icecream fabric sitting in my fabric box for over a year, and I finally decided I needed to make something with it.
 Since I only had two fat quarters of this fabric, I knew I wouldn't be able to make something very big, but I new I wanted to make something I could wear. I copied the the front and back of a tank top I liked the shape of and cut these out. This didn't work as well as I had hoped, and I had to modify the front piece a lot in order to get it to look nice. I took out about 2 centimeters from the center front and added in bust darts that I angled towards the front seam. I folded over the sides of the front and back pieces and hemmed them. Next, I added small pieces of stretchy elastic these sides to add some stretch and interesting detail to the top.
 When making this, I really wanted to showcase the icecream fabric. I think this top does a good job of this, despite having more seam detail than I wanted. The bust darts aren't very visible, but I'm not happy with the center front seam. I do think this top will get some wear out of it, but it's not my favorite. At least I was able to use a fabric I already had!
Panty and Stocking with Garterbelt

For the last day of MCM London, I partnered up with my friend Ruth to cosplay Panty and Stocking from the anime Panty and Stocking with Garterbelt. Both of us made our own costumes. I sewed my skirt, my shirt, my corset, my sleeves, and my leg warmers from white cotton, purple cotton, and a stretchy metallic fabric. The bracelets I painted with silver paint, and the shoes were originally white, which I covered with silver metallic fabric. Ruth patterned the wings, but we both made our own set out of wire, fabric, feathers, and hot glue.
 The metallic fabric was such a pain to use because it was very stretchy and pins would leave permanent holes in it. The corset was particularly difficult because the metallic fabric had to be backed onto a stiff muslin. Hopefully I'll be able to write a more in depth post about how I made the corset despite neglecting to take photos of the whole second half of the process.
 Luckily, that Sunday was the coolest of the days, meaning the costume wasn't too warm to wear. I did have an issue with the shoes, but that was mostly due to my own poor use of glue. Bits of hardened hot glue jabbed into my heel, and the fabric slowly peeled off the shoes. If I were to cover shoes with fabric again, I'd probably do it over the course of a few days using some kind of super glue, or maybe modge podge.
 We also met a couple of lovely cosplayers who were cosplaying the same characters as us! I only have a link for the Panty cosplayer's Instagram, but she has some super cute cosplays on there, so definitely check out her page! I especially loved what they used for the hearts on their outfits!Photos taken by Daisy Tweed
Doctor Who - The Fourth Doctor

Last weekend was London MCM 2017! I went all three days and had a fantastic time. I didn't cosplay the first day, but I wore my french fry dress and got a surprising amount of complements as well as a photo request! If I am able to track down the photo, I'll be sure to share it here! On the second day of MCM, I dressed as the fourth regeneration of the Doctor from Doctor Who.
 Most of the outfit is store bought, but I made both the scarf and the skirt. I knitted the scarf in fifty hours over the course of 5 months, starting on the first of January and finishing just last week on the 6th. My research for the scarf design was a combination of this site and meticulous combing through yarn websites. The scarf is a replica of the scarf worn by Tom Baker in the first half of season 12 of Doctor Who. I think I was able to find a very good color match with the yarn. It took a bit longer to make than I thought it would, and I made a few tiny mistakes, but I am very happy with it. I made it using US size 8 knitting needles.
 The skirt is actually one I made for my costume course at uni. It's an Edwardian skirt with center back snaps and hook and eyes. I did a very good job of pattern matching each seam, which is especially evident in the back panel. The synthetic plaid fabric is backed on a black cotton, and every seam is piped with the same black cotton.
 I met many lovely people at the Doctor Who meet up, but unfortunately I didn't take many pictures. I'm not really sure who took the above photo or who some of the people are in it, so please tell me if you know!
 If I end up going to LFCC this year, I'll be wearing this cosplay on one of the days. I plan on adding a waistcoat and possibly some nice shoes to the costume before then.
Purple Skirt

 As you may have noticed by now, I like making skirts. I believe I've made about five in the past six months. None of them have been very exciting, but they have all been just different enough to justify having their own blog post.
 This skirt is a half circle skirt with a plain waistband. It was pretty straightforward, but I did have trouble with the hem. The hem kept twisting while I stitched it, so instead of having a single line of stitching around the bottom, I chose to have three. The skirt opens and closes using a center back zipper.
 The shape of this skirt is really fun, and I plan on making many similar ones in the future. If you've been reading my blog for a while, you may have noticed that the photo quality has changed. I recently purchased a new camera and I also got a remote clicker! This means that I no longer have to rely on a timer to take photos of myself. I'm hoping this will encourage me to always take photos of my work, and I'll be sure to blog about them here!
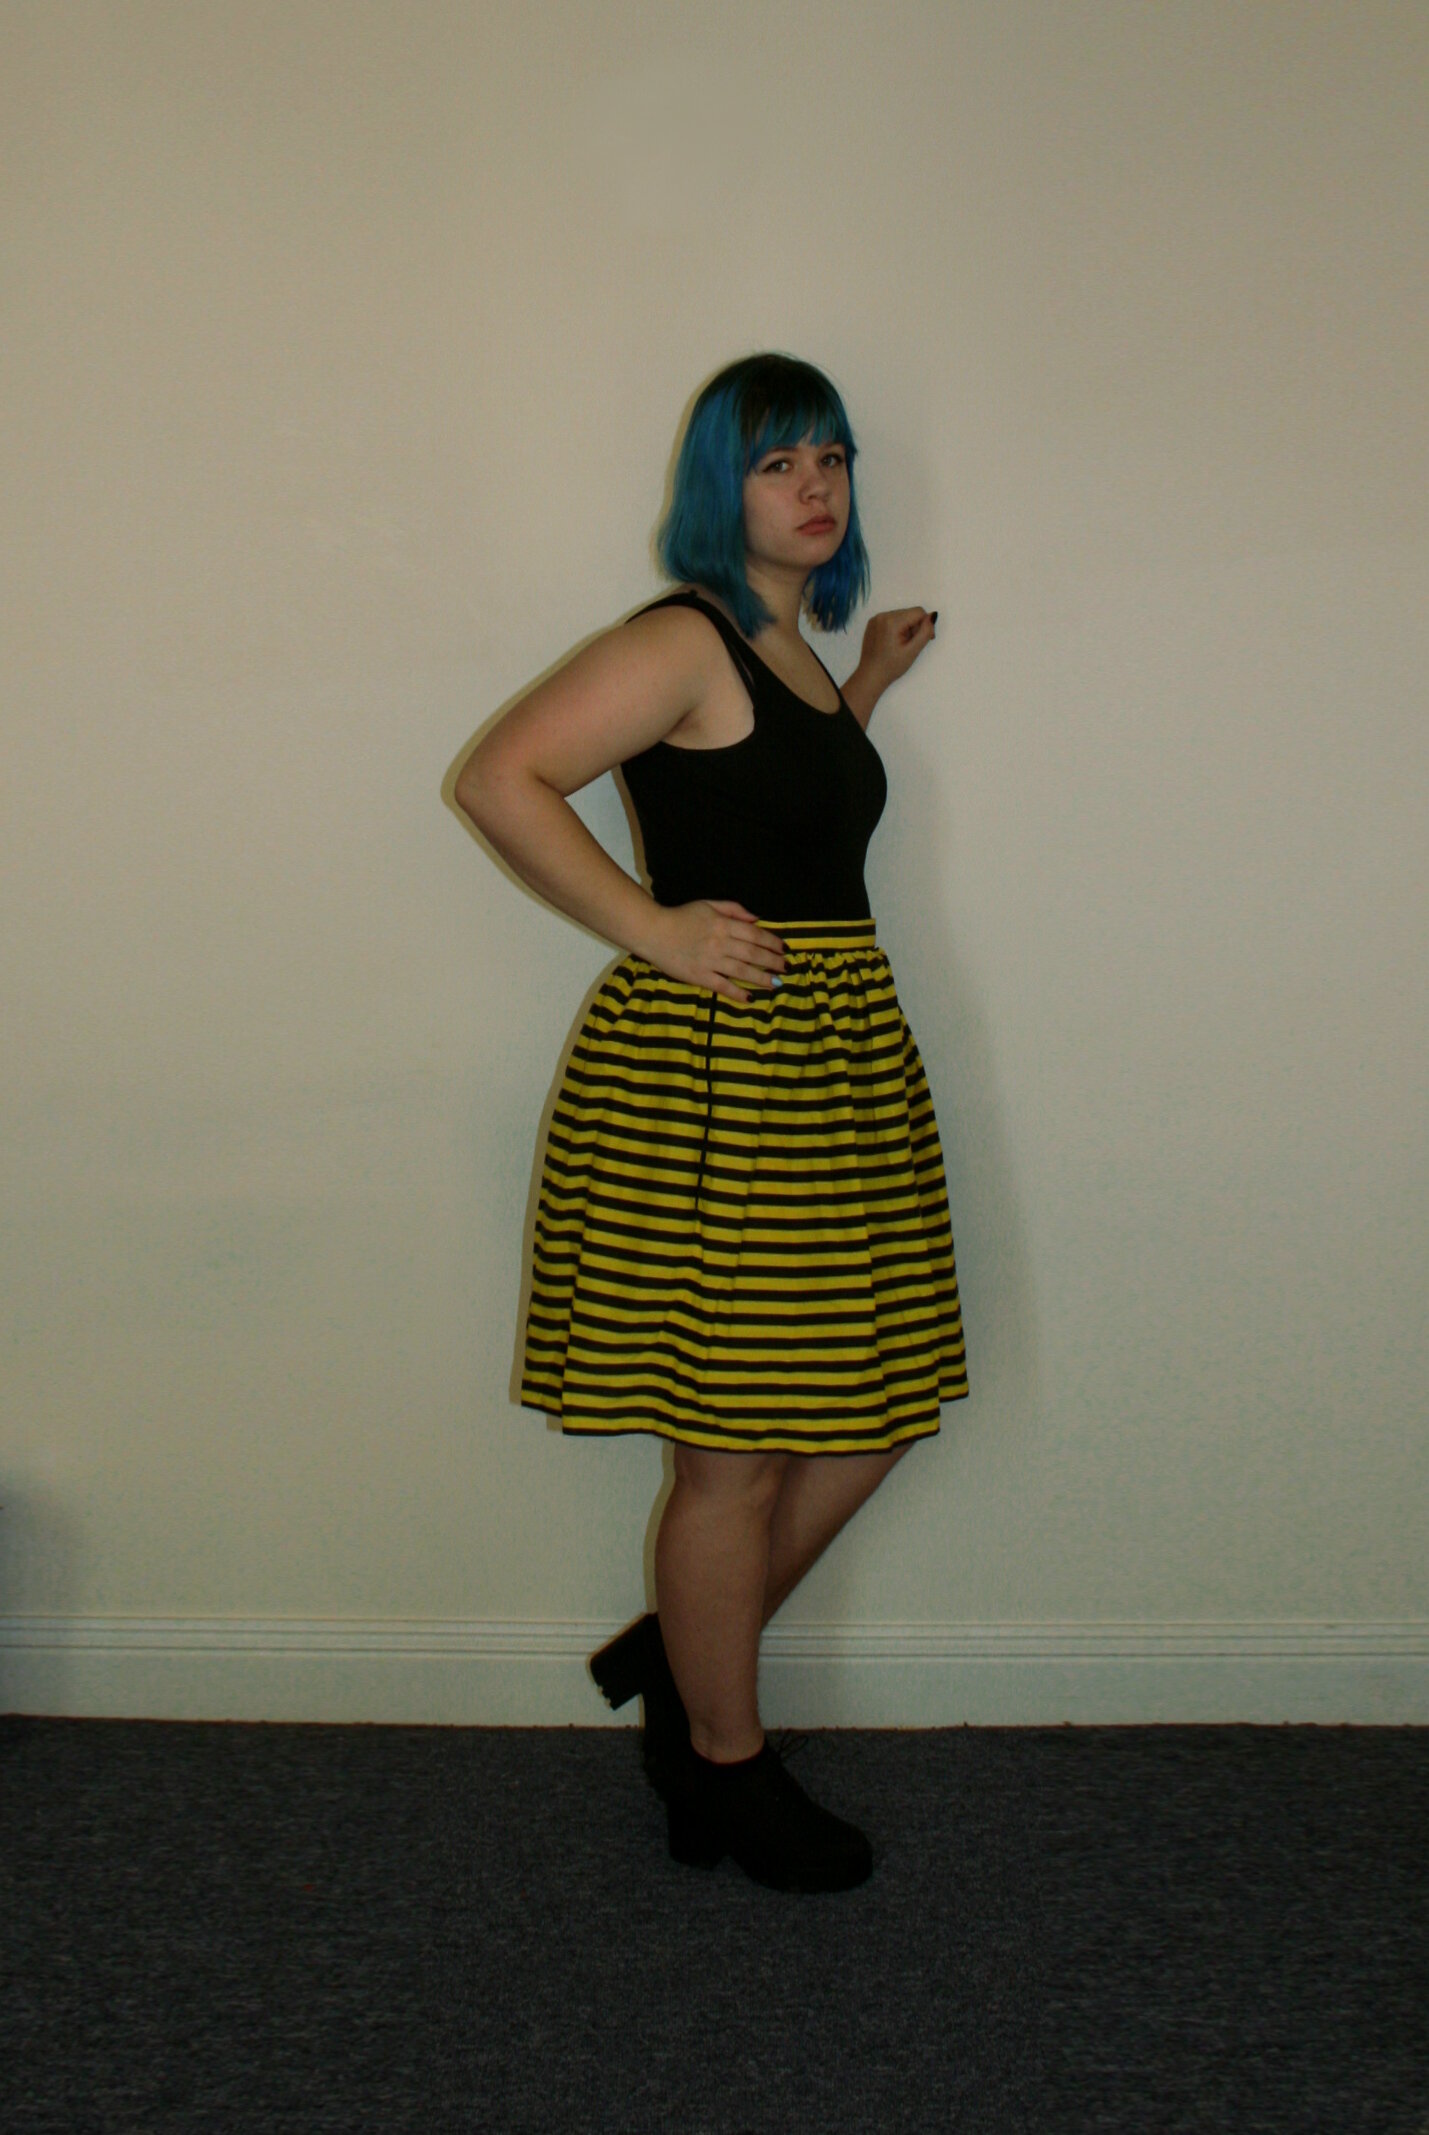
Bee Skirt

 I made this skirt as part of a costume for a bee party I went to a few months ago. Since I haven't been doing the best job of taking photos as soon as I make something, this post (as well as the next one) are quite late.
 I went on amazon and bought two meters of the cheapest black and yellow striped fabric I could find. Originally, I had intended to make a dress from Gertie's Ultimate Dress Book, but I came across a problem when it came to the bodice. I cut the bodice out a size larger than it needed to be, but the armholes were so small I couldn't fit my arms through them.
 Because I was a little pressed for time, I gave up on trying to fit the sleeves and bodice to myself and made a skirt instead. The skirt is simple, made from three rectangles: the front, back, and waistband. I zig zag stitched all the raw seams and included a side zipper.I would like to eventually make this skirt into the dress I originally wanted. The bodice pieces only need small modifications in the shoulder and armpit area. While the pattern originally called for short sleeves, I probably won't include them because I don't have enough fabric left to recut them.

Dolly from Luxury Comedy

I've been watching a lot of Luxury Comedy recently, so my friend Alice the Insane and I decided to dress as Noel and Dolly. I made the dress and cut and styled the wig myself, too. The tights, shoes, and belt I found on Amazon and I already owned all of the jewelry and makeup.
 The dress was a weird thing to make. There's one sleeve, a weird flap in the front, and shoulder pads. I patterned a shift dress and the sleeve using flat pattern drafting. To make the front flap, I cut out two shift dress fronts and sewed one to the back on both sides and the other on only one side. I then cut the top front (the one sewed in on one side) so that the free side slowly came in until it was about five inches from the side seam. Next, I folded over the side and sewed a hem using my machine. I also hand sewed the edge of the top of that side hem onto the side seam so that the flap would fall where I wanted it to.
 Instead of fully lining the dress, I made a facing to go around the neck and the left armhole. It's herringbone stitched in place to make sure it wouldn't flip up or move around, and I used it to help keep the shoulder pads in place.
 I actually really like the dress and might wear it without the rest of the costume sometime. It's a little dressy to wear to uni, and the shoulder pads are kind of a weird element, but I think I can find use for it somewhere.
 The makeup is still probably the funkiest part of this outfit. I spent a lot of time trying to get it just right, and I ended up needing some help with my eyebrows from my friend on the day of the con.
 Thanks for reading and Happy Halloween! ?
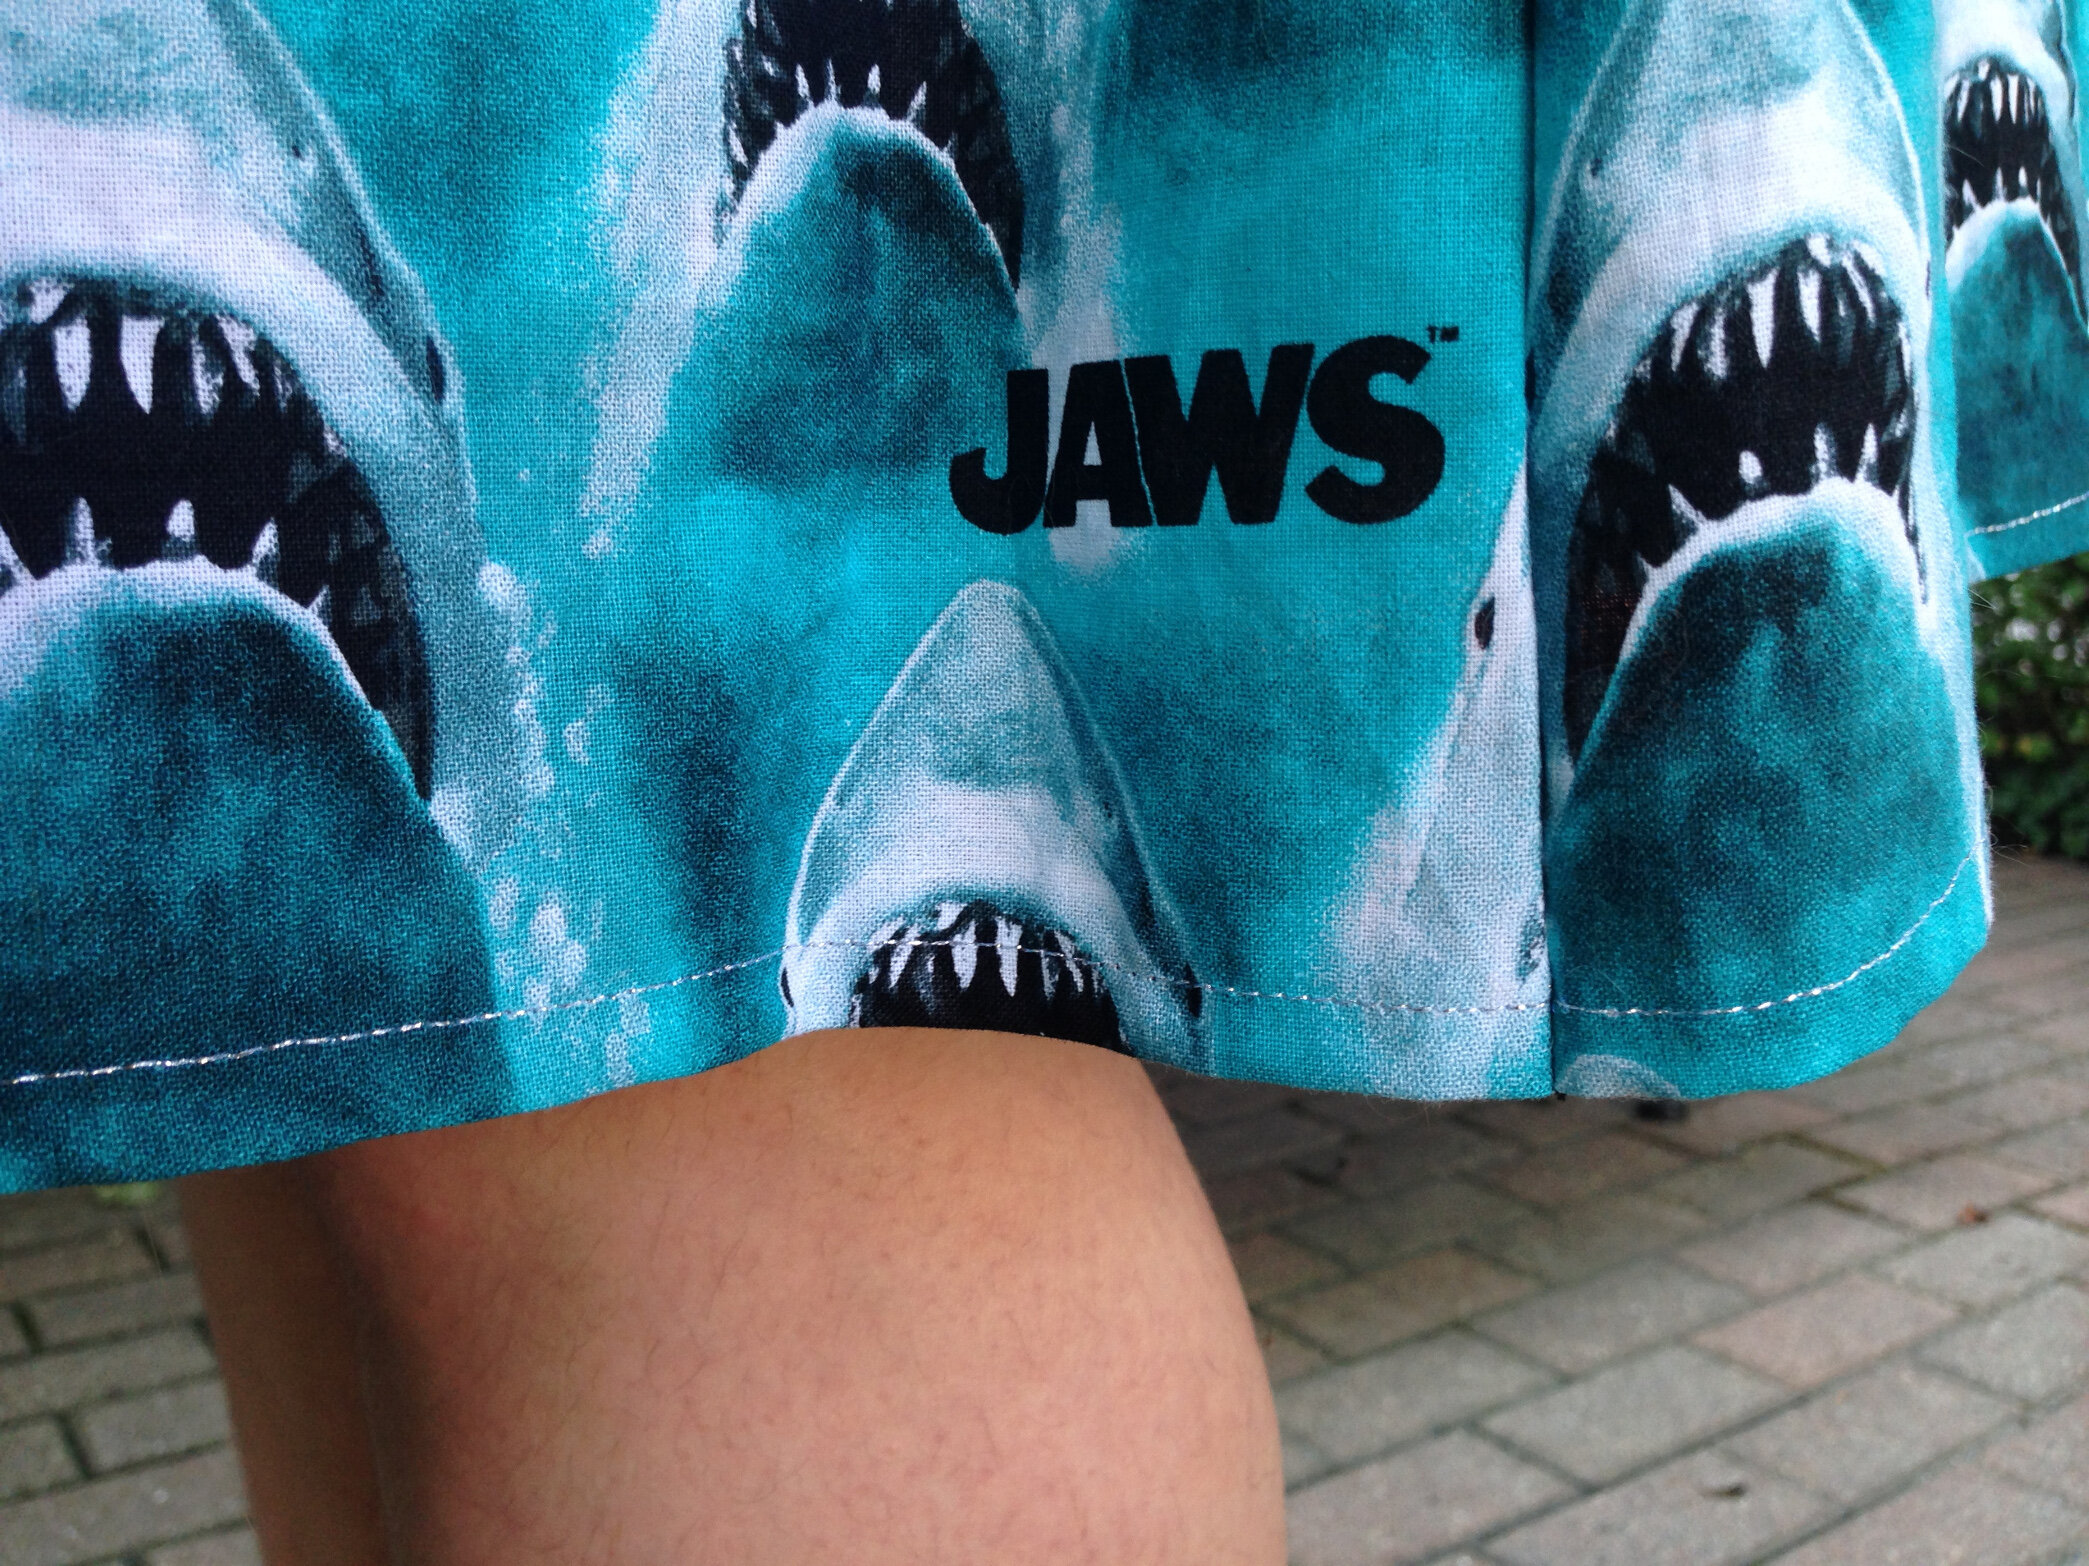
Jaws Skirt

I saw this teal Jaws fabric at Joann's and fell in love immediately. I bought three yards, intending to make myself a matching short and shirt set.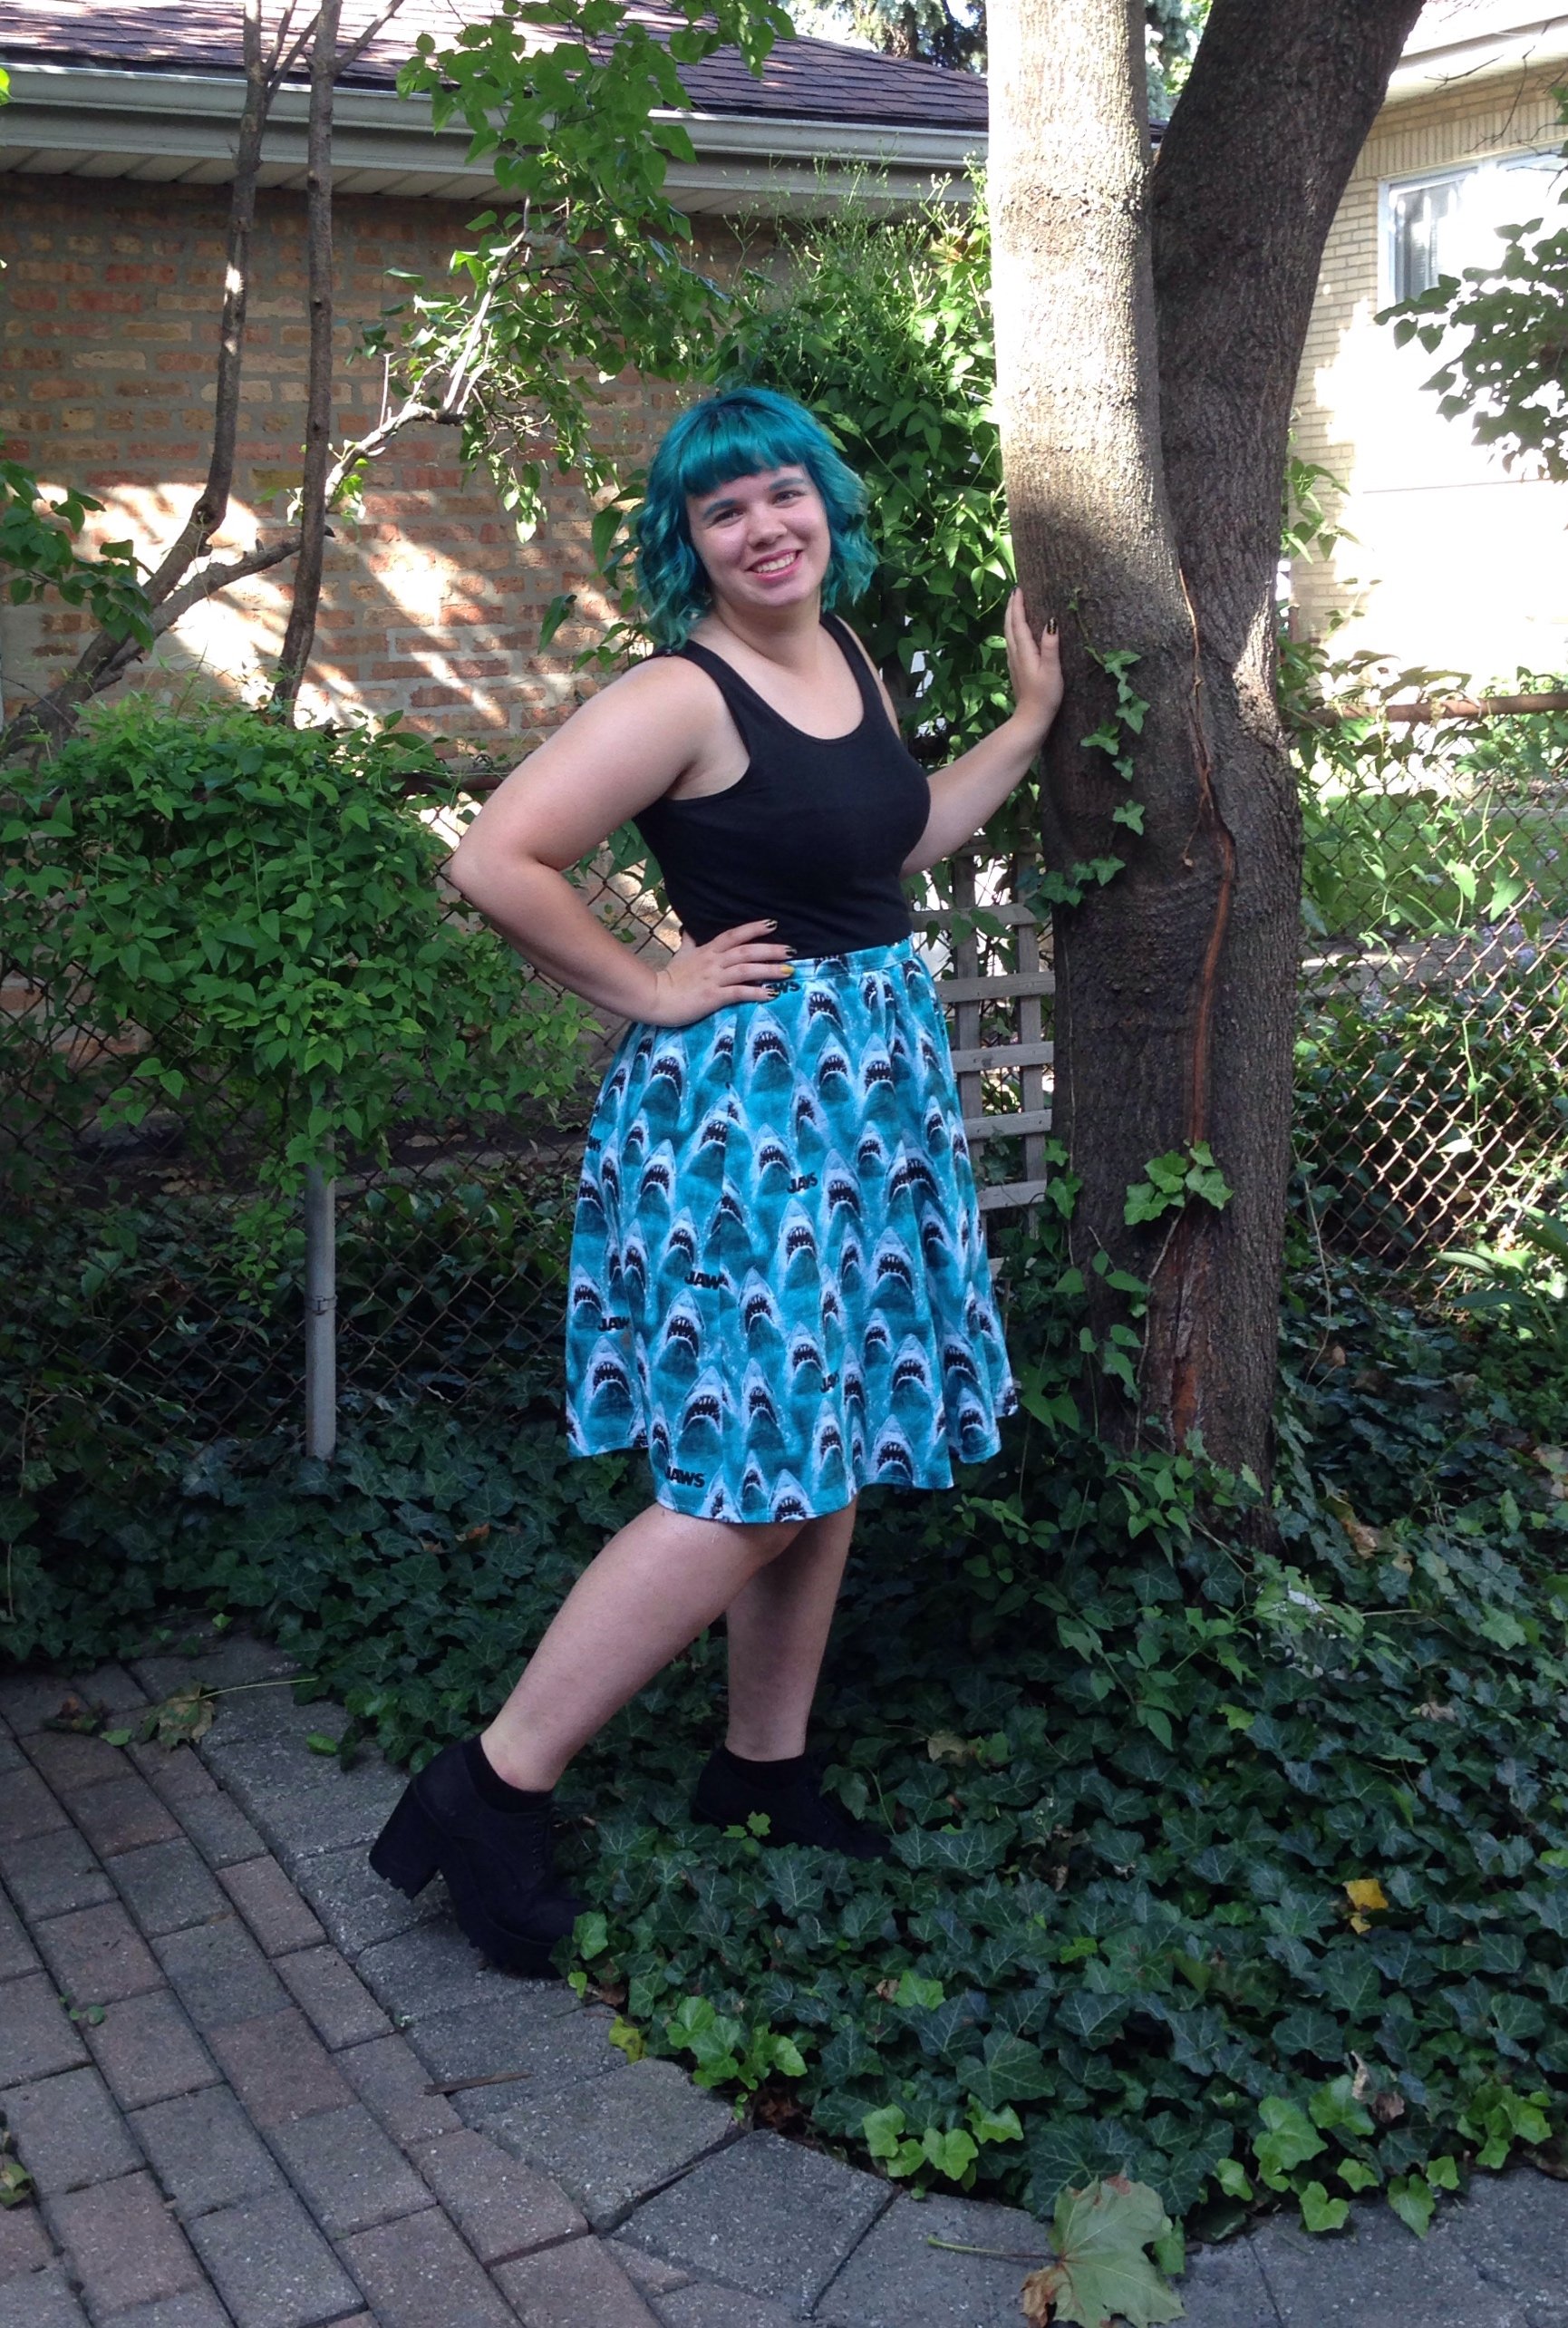 Clearly, I did not end up with shorts or a shirt. Initially, I used about two yards of the fabric to attempt to make a pair of shorts that looked like a skirt, similar to short culottes but with a gathered waist.
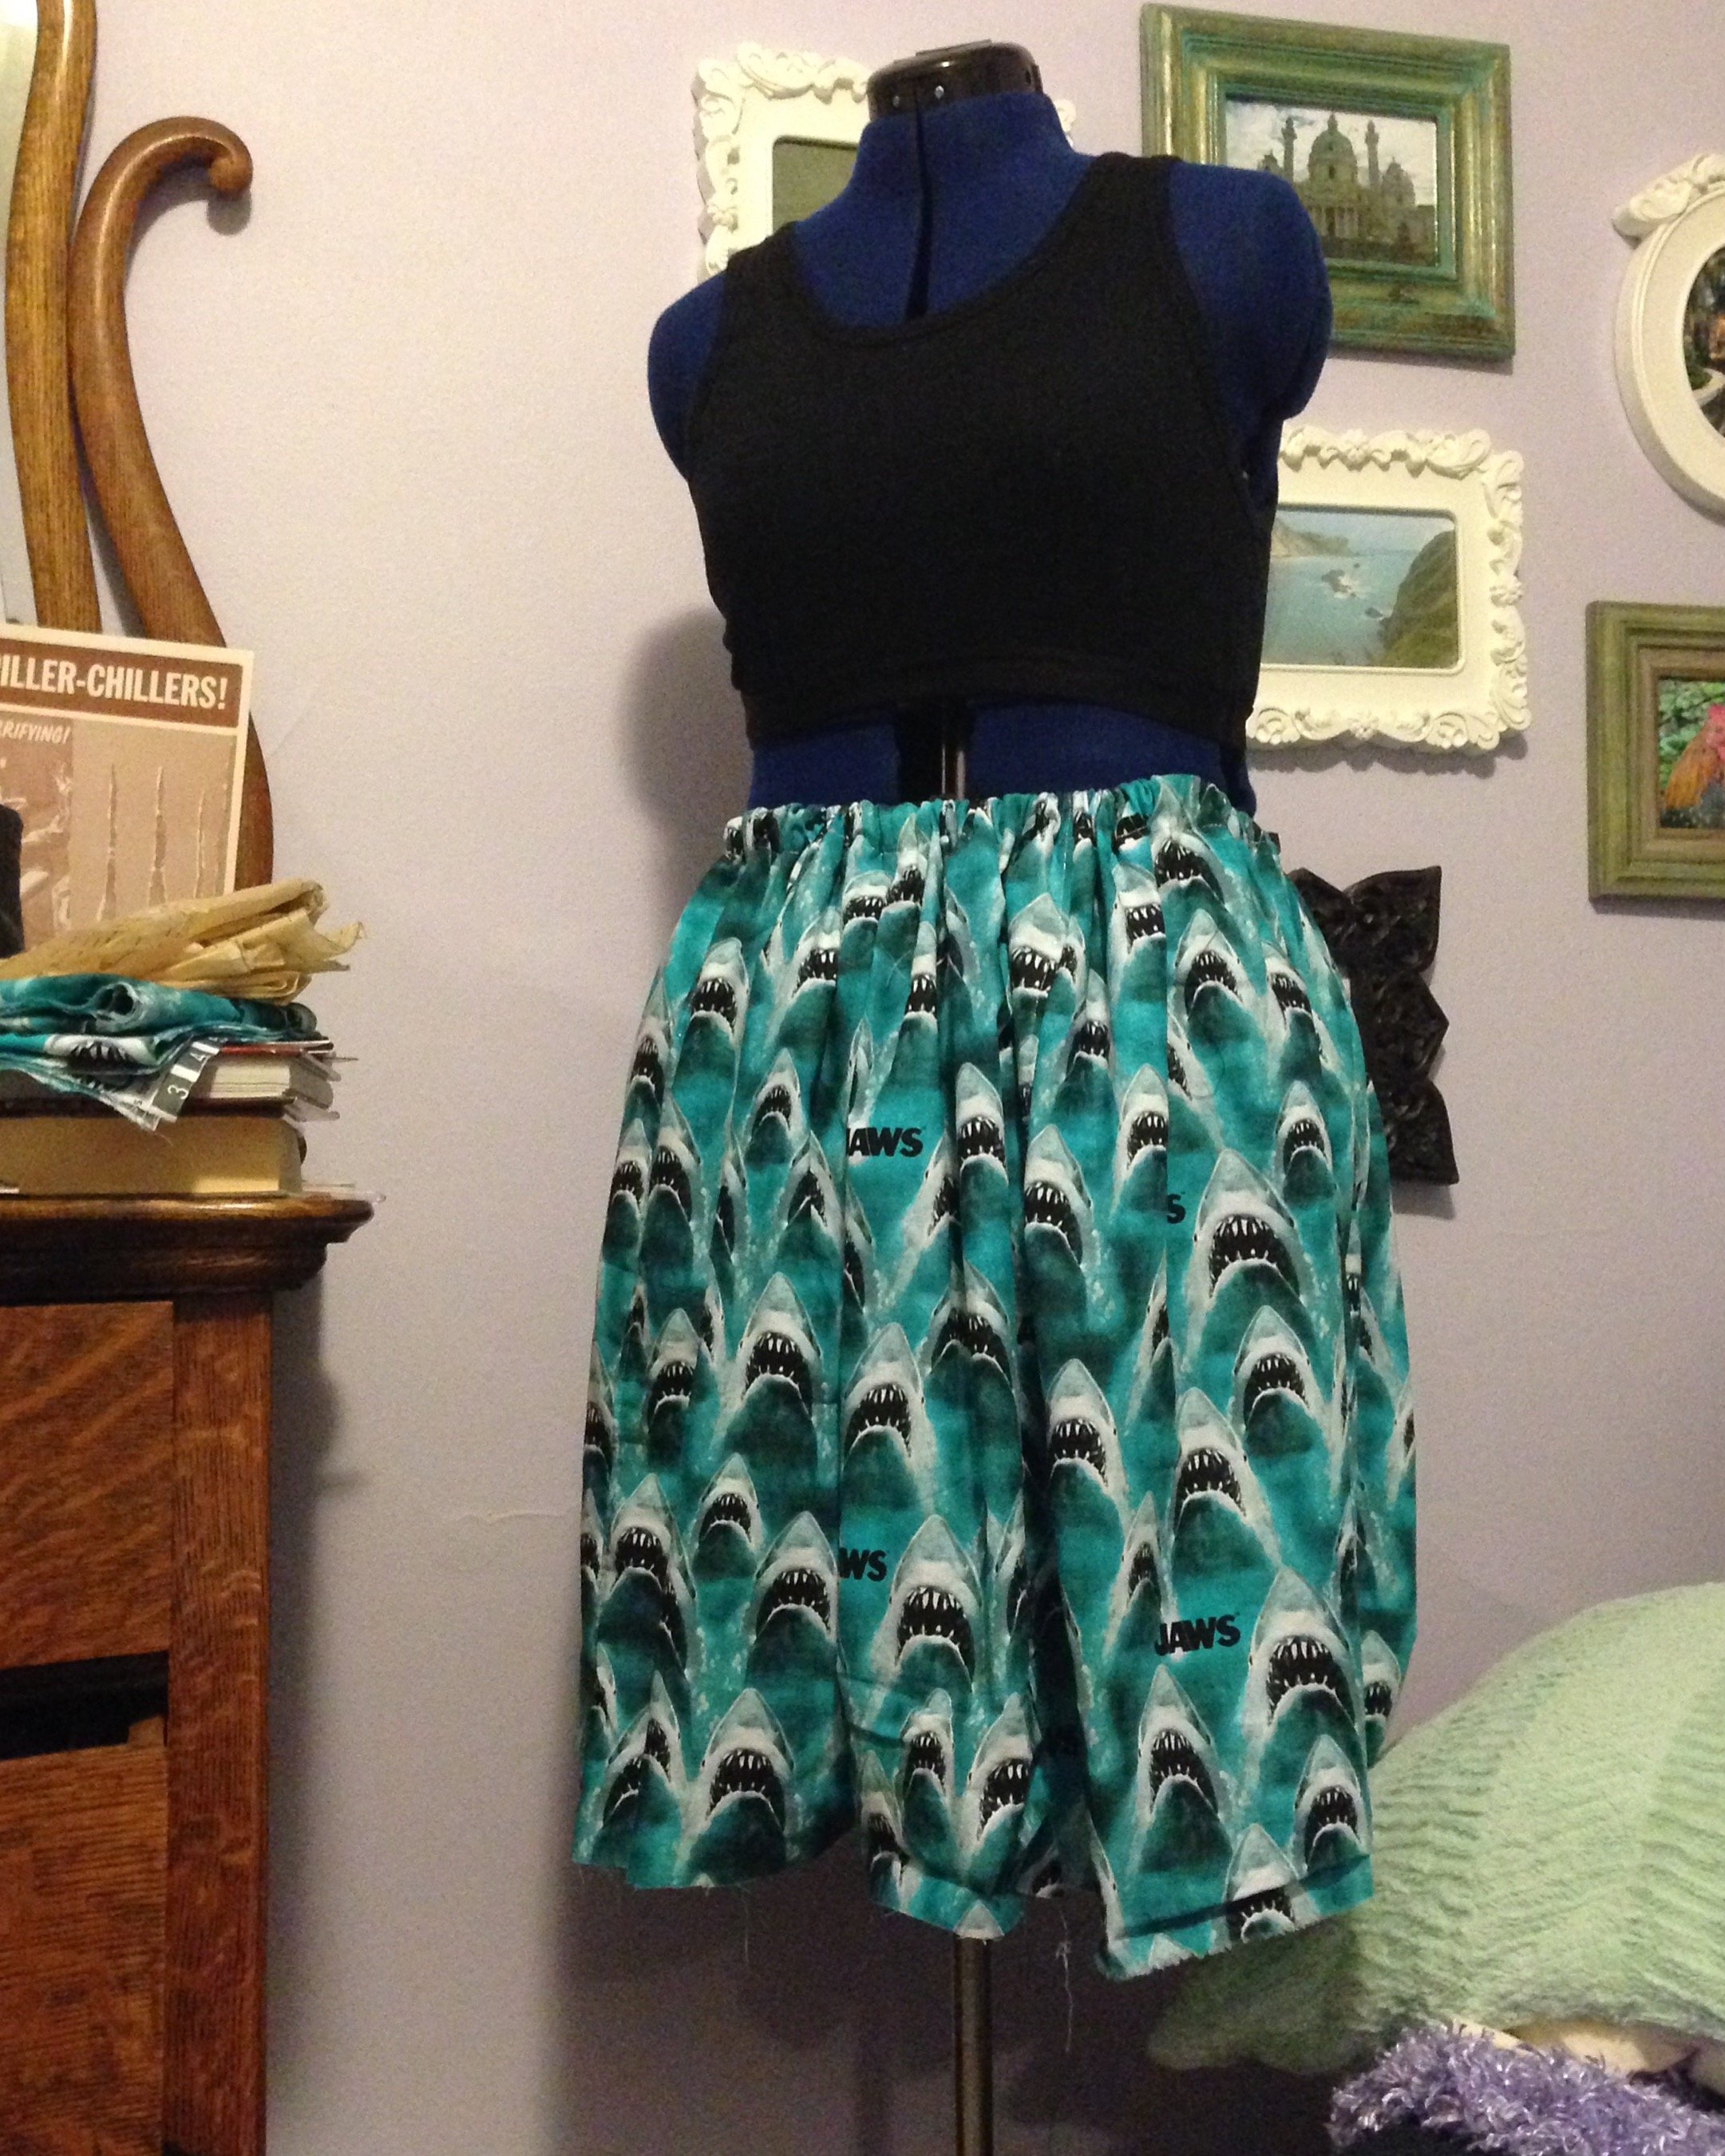 This is how the shorts looked around my second attempt. The looked fine on the mannequin, but when I put them on there was a weird triangular gap in the lower center front and back. Not only that, but when I sat down, they pulled in weird places and were uncomfortable to sit in.
 I left the shorts alone for about a week, trying to figure out what to make from them. Eventually, I just cut the shorts into 6 large isosceles trapezoids. I sewed the sides of the trapezoids together, leaving one side open, and gathered the top into a waistband.
 On the side that was still open, I sewed in an invisible zipper and two hooks and eyes. I then folded over the waistband and top stitched across the bottom with a silver glittery thread.
 I had already hemmed the shorts with the glittery silver fabric, so I just made sure to line up the bottoms of the pieces carefully so I wouldn't have to sew another hem.
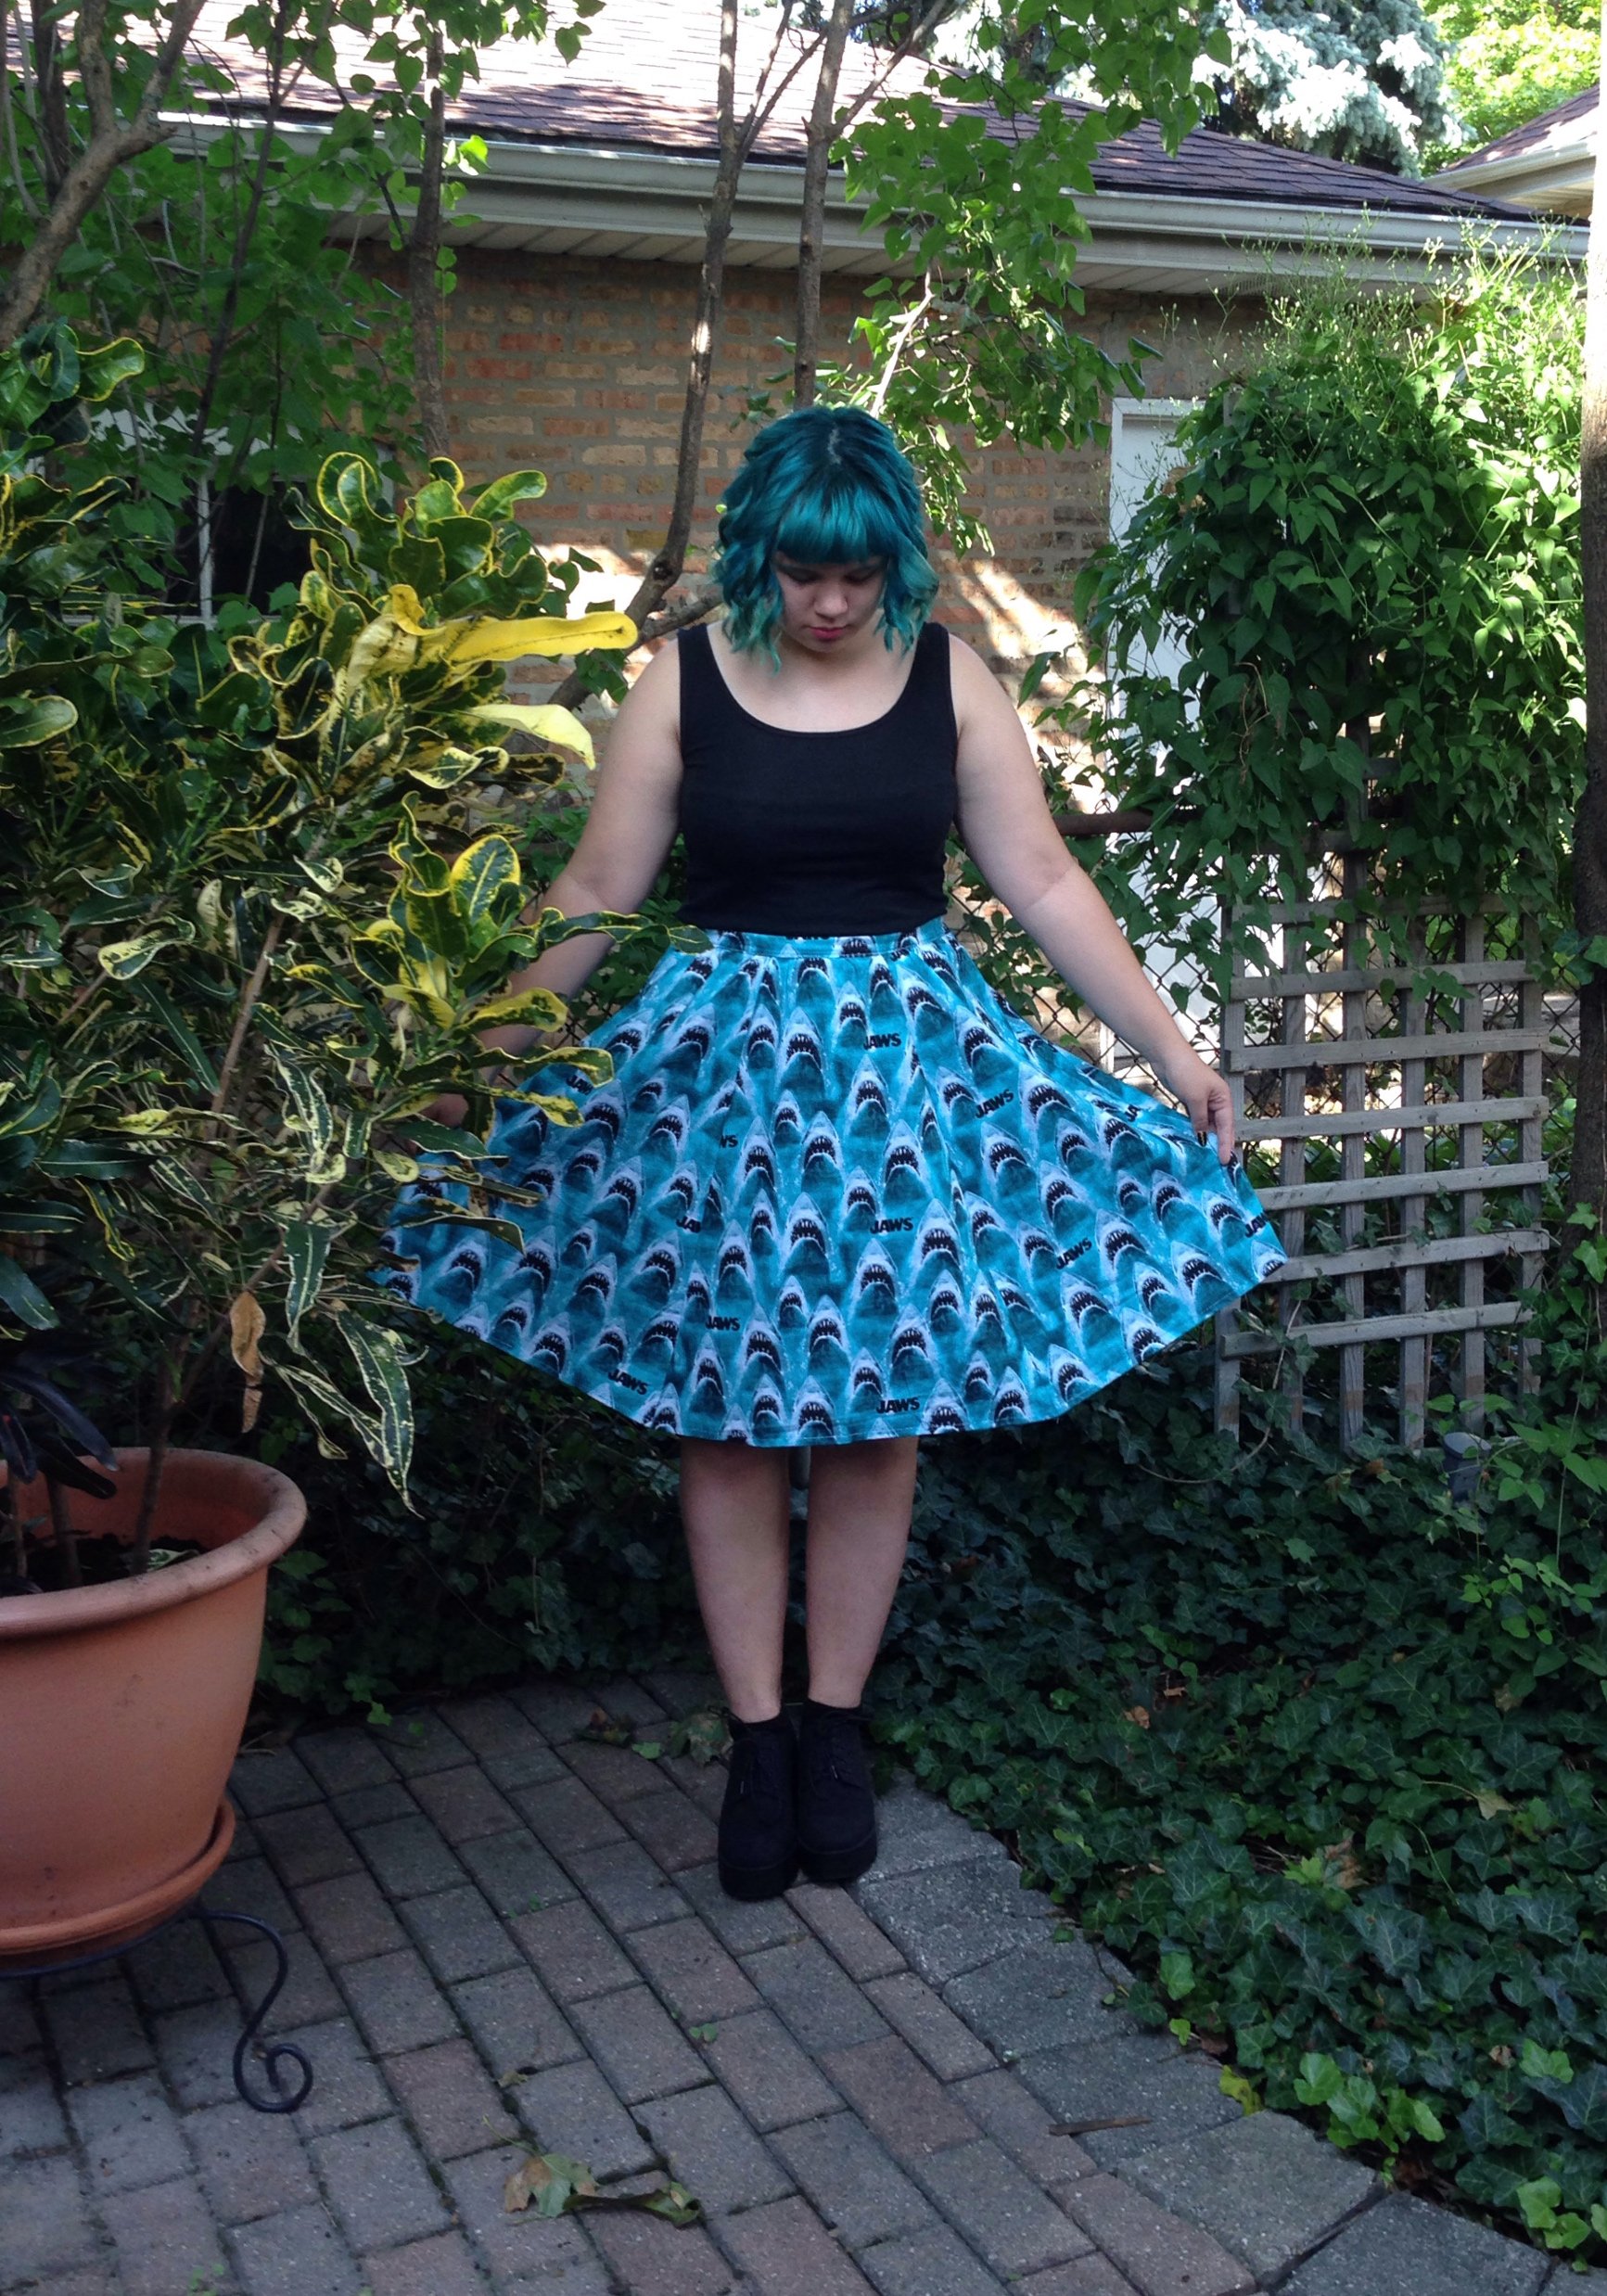 After I finished the skirt, I did not have enough fabric left to make myself a matching shirt. There might be enough left to make my little sister a skirt, so there may be another Jaws Skirt post in the future!I really like how this skirt turned out and have already worn it twice. I will definitely be wearing this a lot more!
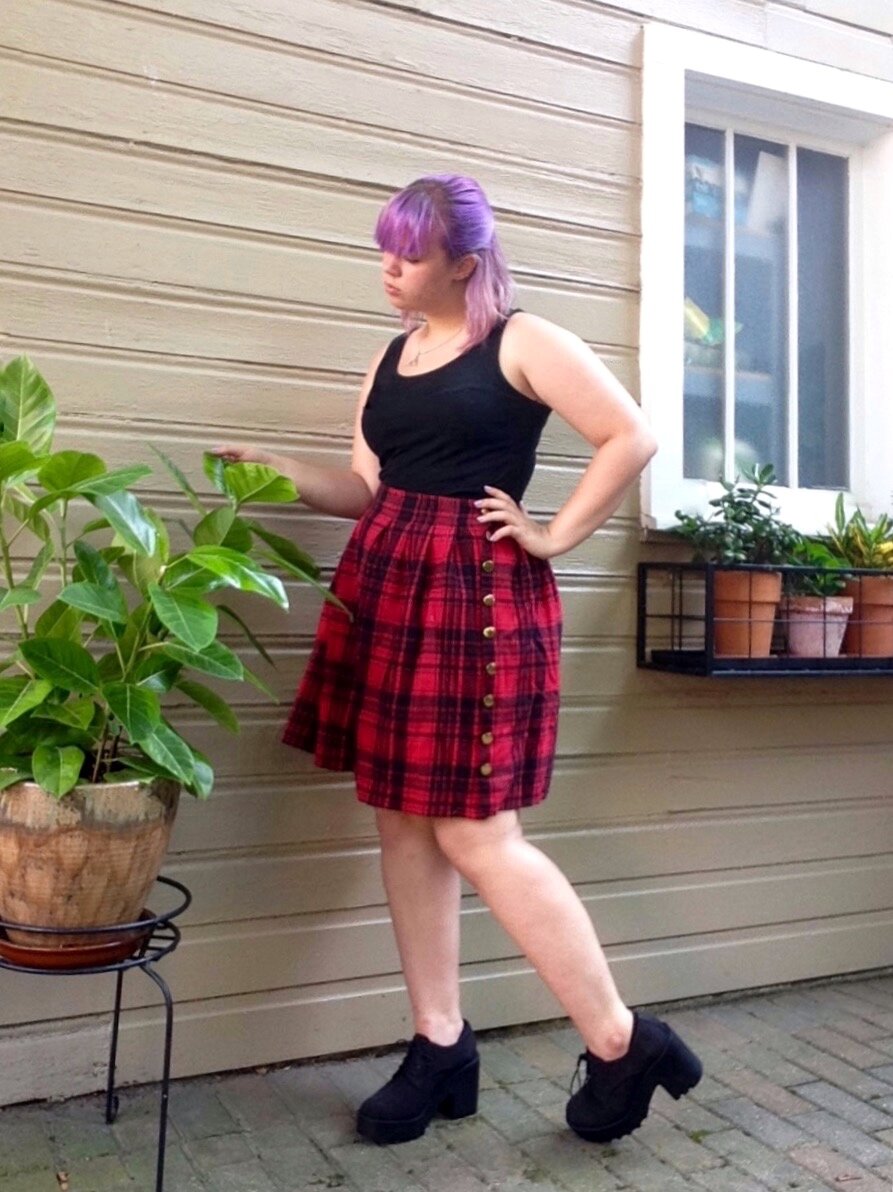
Pleated Plaid Skirt

I made this skirt using just a little over a yard of plaid flannel fabric and about 18 gold buttons. The flannel had been purchased so that I could make a nightshirt for my dad. However, when I had finished making him a nightshirt, I had just enough fabric left to make myself a skirt. The skirt was pretty simple, made from just two rectangles pleated in the front and the back. I didn't even make a waistband!
 The most difficult part of the skirt was probably trying to get all of the buttonholes to line up properly. I would have used a simple side zipper, but I did not have one and I had just been to the fabric store. Since the skirt is made from flannel, it is very warm, which will be great for the fall and winter.
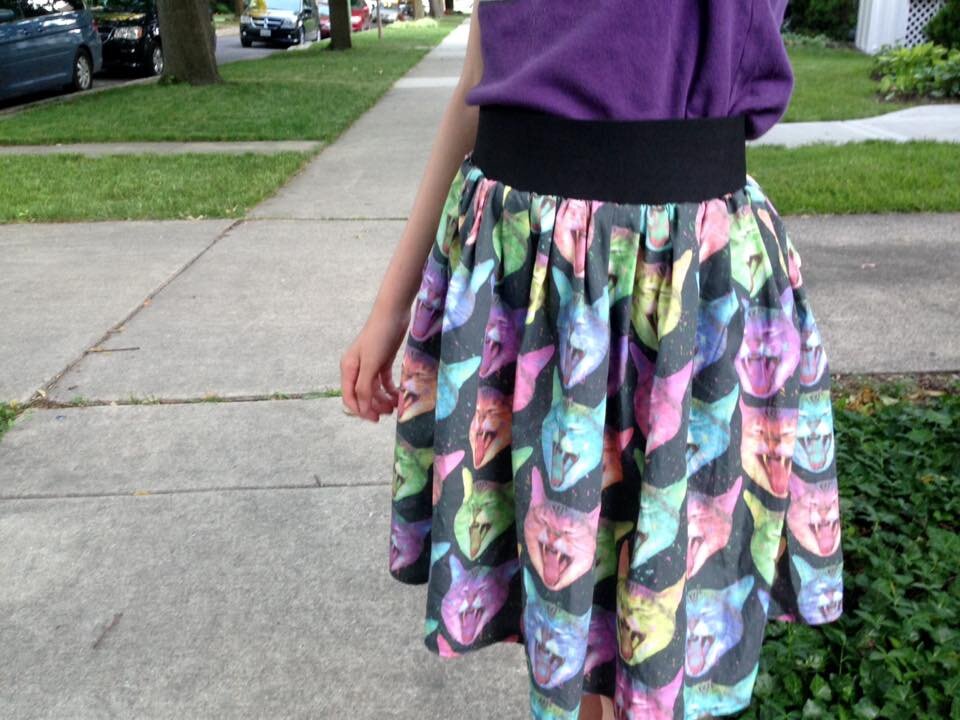
Laughing Cat Skirt

About a year ago, I bought a yard of my Laughing Cat fabric on Cotton Poplin. It sat in my room, almost 4,000 miles from where I go to school, until I came back for summer break and pulled it out, determined to use it for SOMETHING.A yard of this fabric wasn't enough to make anything for me, so I made my sister a skirt! I made her a simple gathered skirt with an elastic waist. It's probably one of the easiest things I've ever made, but it shows the pattern well.
 If you want to make one, you just need to take two rectangles of fabric, sew them together on the sides, zigzag stitch one side to a loop of elastic, and then hem the other end. Super simple!

New Fabric Designs!

If you have a Spoonflower account and follow my account, you've probably noticed some new designs. I've been working on a fabric collection based on paint. The first fabric, called Black and Blue Mirrors, is a simple black and blue repeating pattern. I created this design using acrylic paint and paper. I then scanned the painting into my computer and cleaned it up as much as I could before I ordered a yard of fabric from Spoonflower.Why did I order a yard of fabric, you ask?
  For a swap with Alice the Insane, of course! I gave her a yard of my design printed on cotton poplin ultra in trade for a super cute bag that she made to match our Kylo Ren and General Hux cosplays that we wore to MCM London.
  I really like the bag she made, and I've been using it so much! It's a really good size for everything I need with me on a daily basis.
 I love the dress she decided to make from the fabric, I think she did an amazing job keeping the pattern intact and that having the design off center was fresh and different.
 She added bias binding to the neck edge, and the dress opens at the side with a zipper. Isn't it lovely?
 This is the other fabric that I designed, also made using acrylic paint, paper, and a scanner. It's only the second fabric in my 'Paint' fabric collection, and I'm hoping to add at least two more painted fabric designs over the summer.
 Be sure to check out Alice the Insane's facebook page!If you're interested in purchasing either of these fabrics, they are available here.

Gunter

 You may recognize this penguin as Gunter from the animated tv show Adventure Time. I made this tiny knitted fellow using this Adventure Time Gunter Pattern.
 I made him for my friend Scott's birthday. It was my first time knitting a stuffed animal, and it was a lot easier than I thought it would be, even though I don't own double point needles and had to make him on regular needles.
 Since I worked him on normal needles, I had to sew up a lot of seams. Luckily, the seams are almost impossible to see on the finished plushy.
 I also modified the pattern slightly when I made the feet, and added one row on each toe on accident. I think it worked out fine, and made his toes more distinguishable from each other.Over all, the pattern was surprisingly easy to knit, and I really like the result. Thanks for reading!

Raspberry Hood

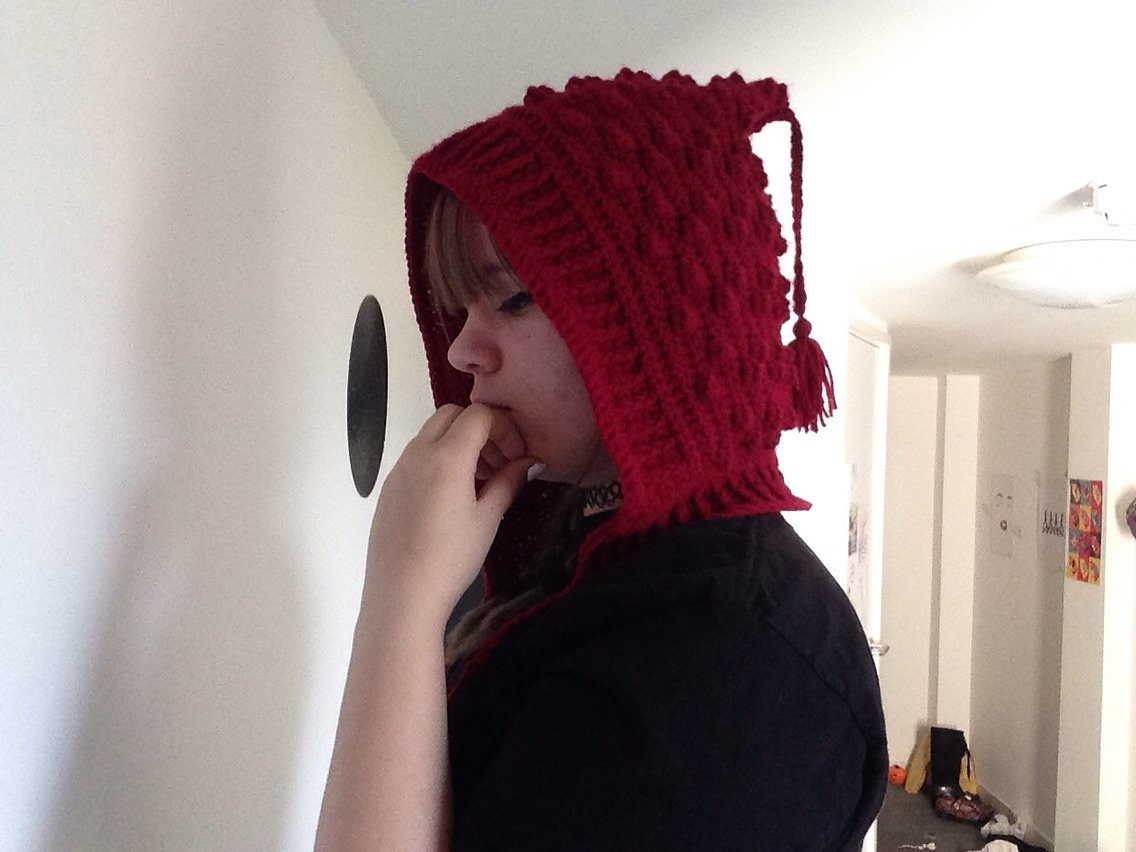 I made this hood using the Bobble Hood with Tassels pattern.
 It was easy and straightforward to make,but I did have a little trouble with the borders. I somehow messed up the back post single crochet so that it was on the wrong side of the piece, and had to match that when I made the second portion of the edging stitch.
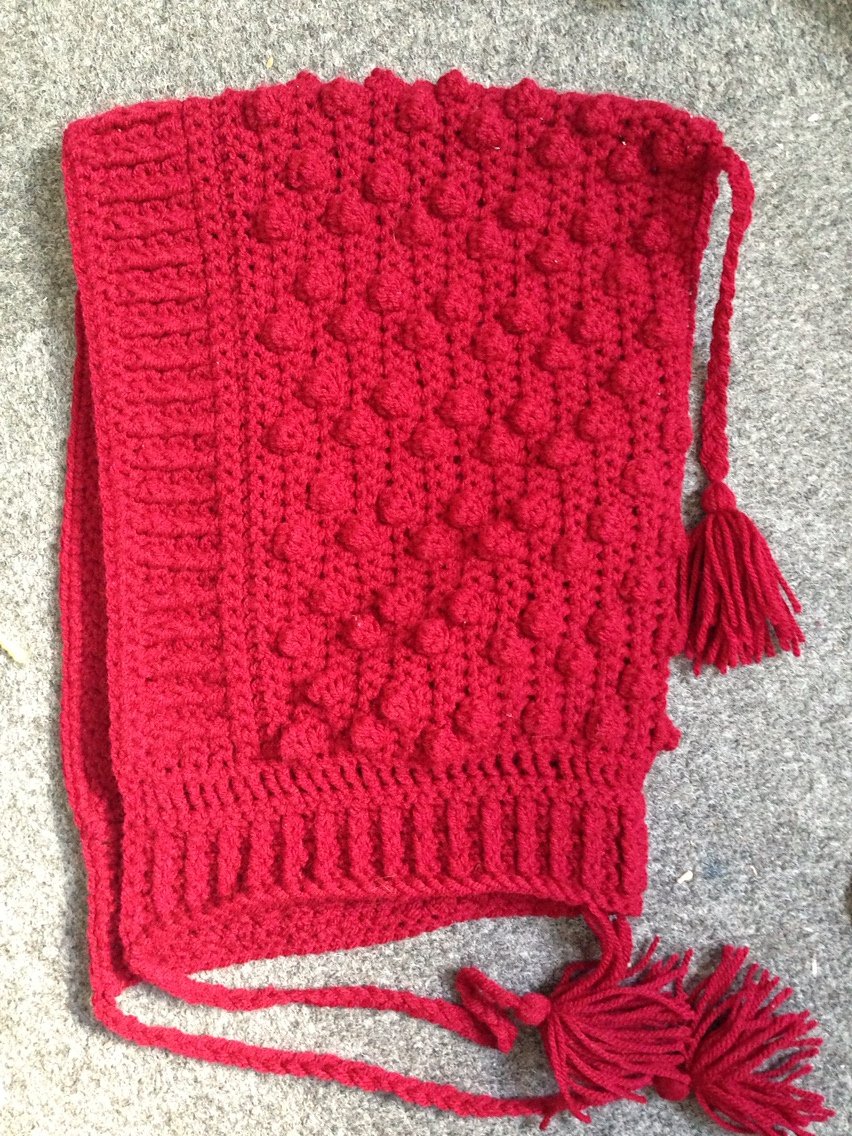 Looking back at the pattern, my hood appears to be a bit smaller than the original, and the bobbles are in slightly different places. I'm not entirely sure what I did to cause this.
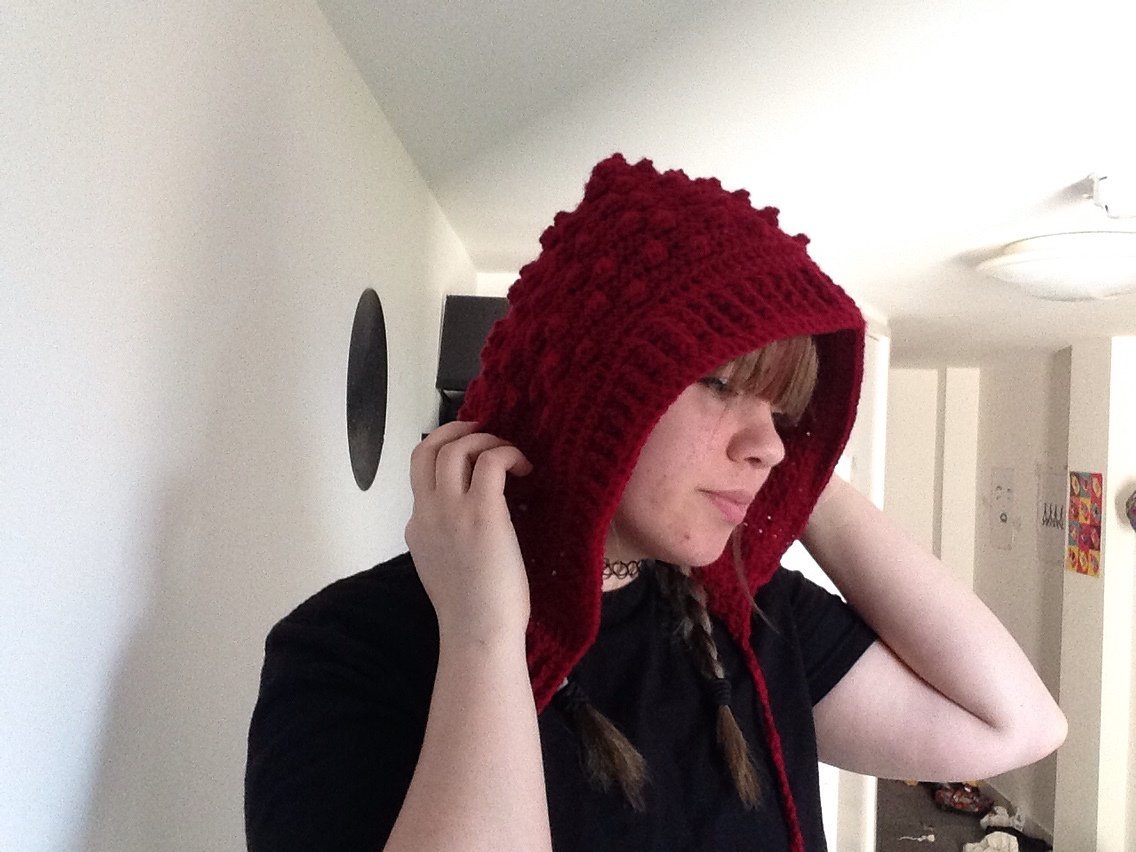 I am happy with the hood I ended up with, but I'm not sure it was the one that I was trying to make. I've received a lot of compliments on it, and might make another one. Next time I'll pay closer attention to the pattern to figure out what I did wrong.

Hamburger and Fries

 I started working on this sweater exactly two weeks ago, and I'm really proud of how much I've made so far, even if I'm not finished. Eventually, the sweater should be a replica of the Hamburger and Fries sweater that Mabel Pines wears in the television show Gravity Falls.
 I used the Laura Sweater pattern and also drew inspiration from this version of the sweater. (The second link is only visible to those with a Ravelry account.) I made the collar 9" instead of 12". I added six rows to the raglan part of the sweater in order to make the armholes fit my arms better.
 In the pattern, the body of the sweater is 12" long before the bottom ribbing is worked, but I made mine about 16" long.
 I'm only about halfway done with one sleeve and it's a little tight, but still wearable. If I were to make this sweater again, I would modify it so that the sleeves would start out wider. The torso of the sweater fits perfectly, except for the very bottom edge where I cast off. I used the slip slip knit method, thinking that it would be super stretchy, but it is not. I might go back and redo my cast off row if I can find a stretchier cast off.If anyone has any super stretchy cast off methods, please share them with me!